Step 4. Create an Amplify Central environment and connect your Kubernetes cluster to it
There are several steps to complete the connection of your prepared kubernetes cluster to AMPLIFY Central. A new AMPLIFY Central environment must be created and the secure tokens for this environment must be downloaded and copied to your cluster as part of the Axway Mesh Agent deployment process. This process will also add the Istio service mesh (when needed), separately deploy the Axway Mesh Agents and also complete the external DNS configuration needed to define the public address of your environment.
These steps are based on creating a new Amplify Central account where your account is the primary (ie, original) account that has the Administrator role assigned. The Mesh Governance feature (in Beta) still requires you to be the primary Admin account and is not enabled (or visible) when you are using a secondary account that has the API Developer role assigned.
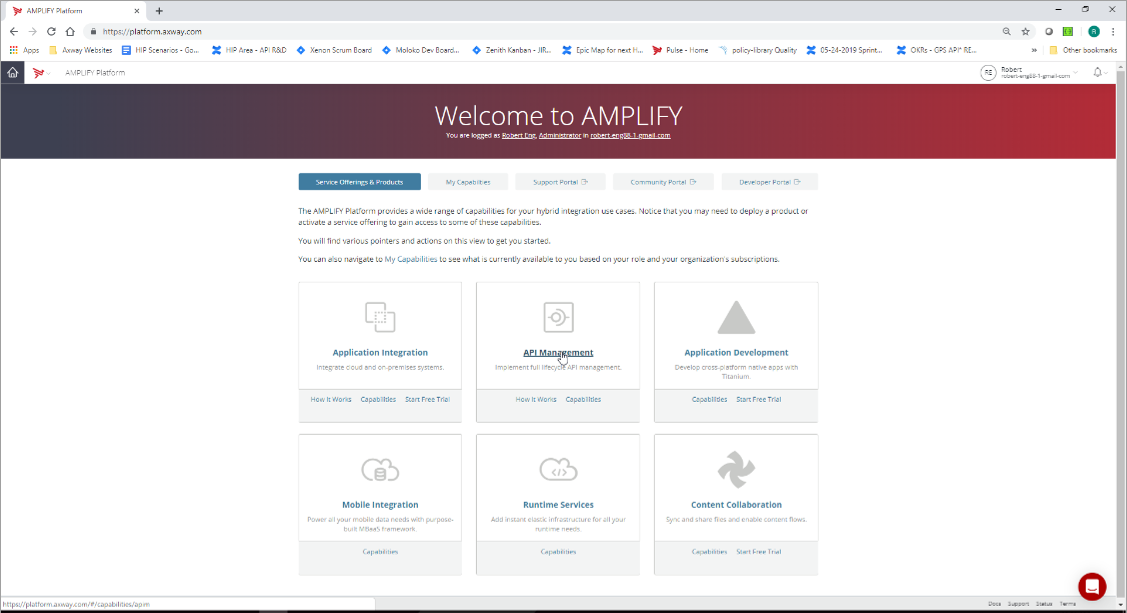
This is the welcome screen after logging into the Amplify platform at https://platform.axway.com/
Please click on the tile for API Management
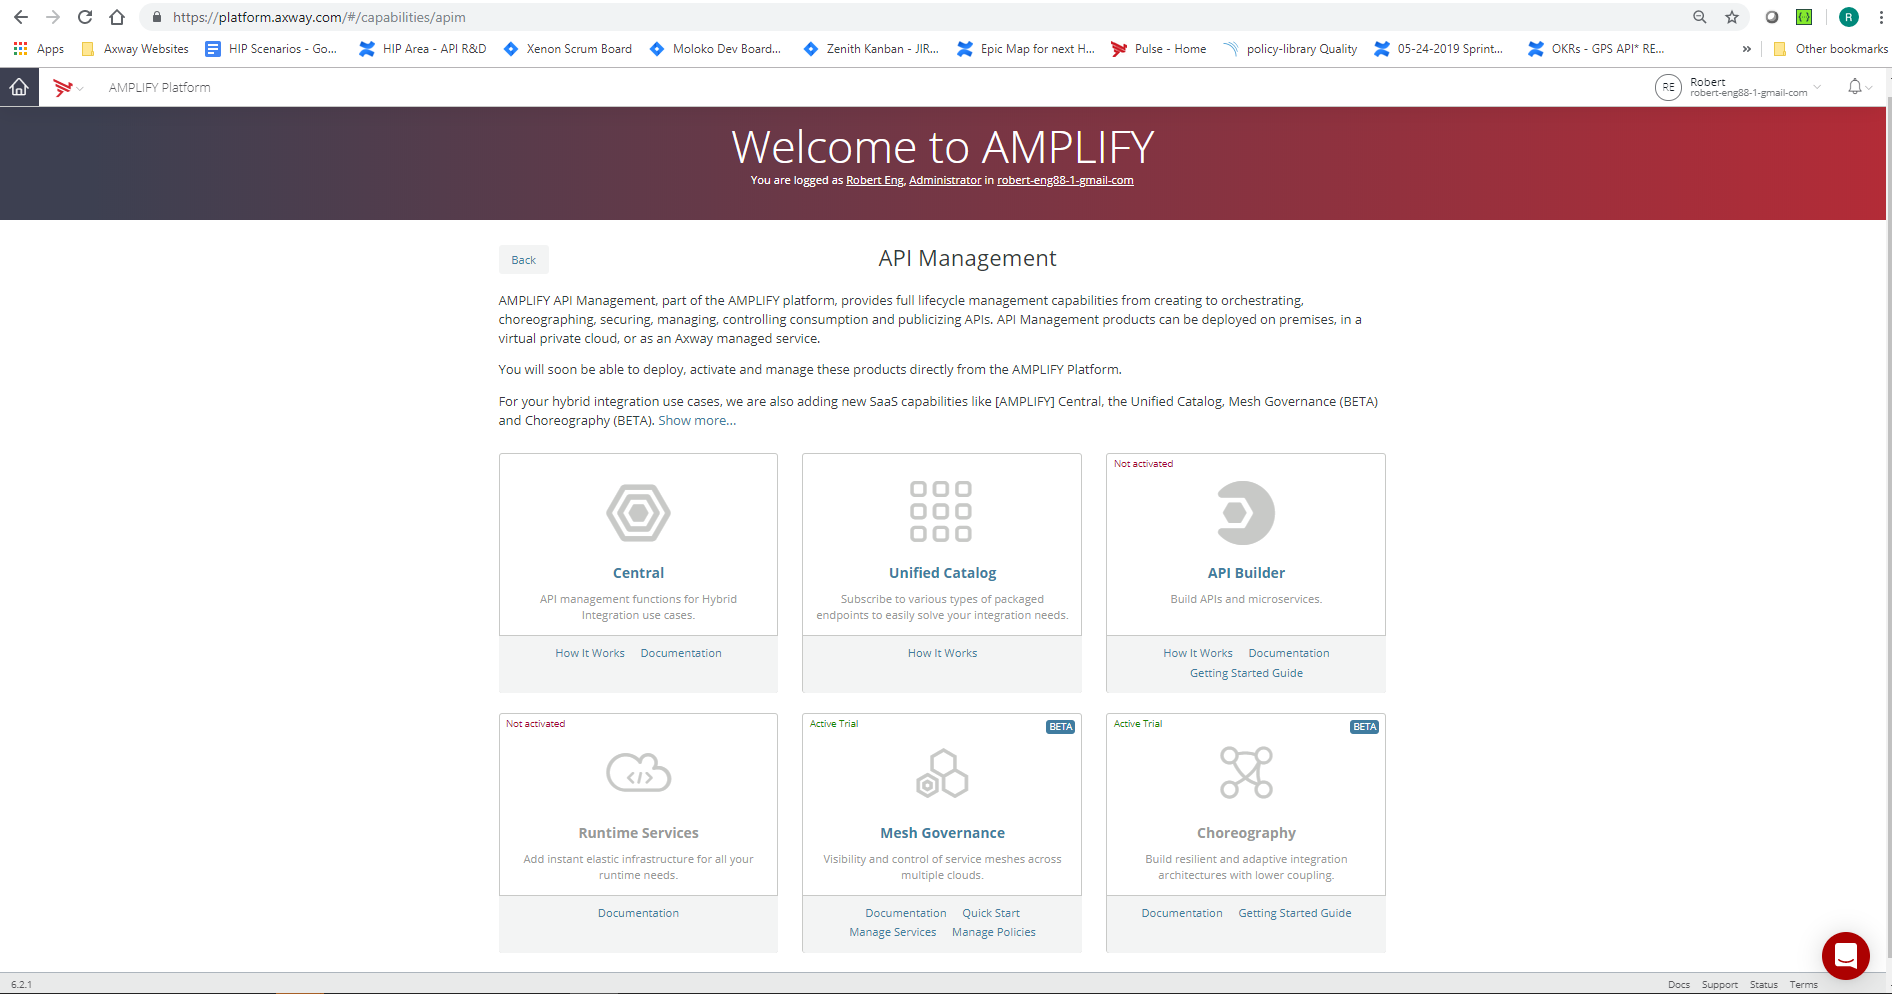
Next, please click on the tile for Mesh Governance.
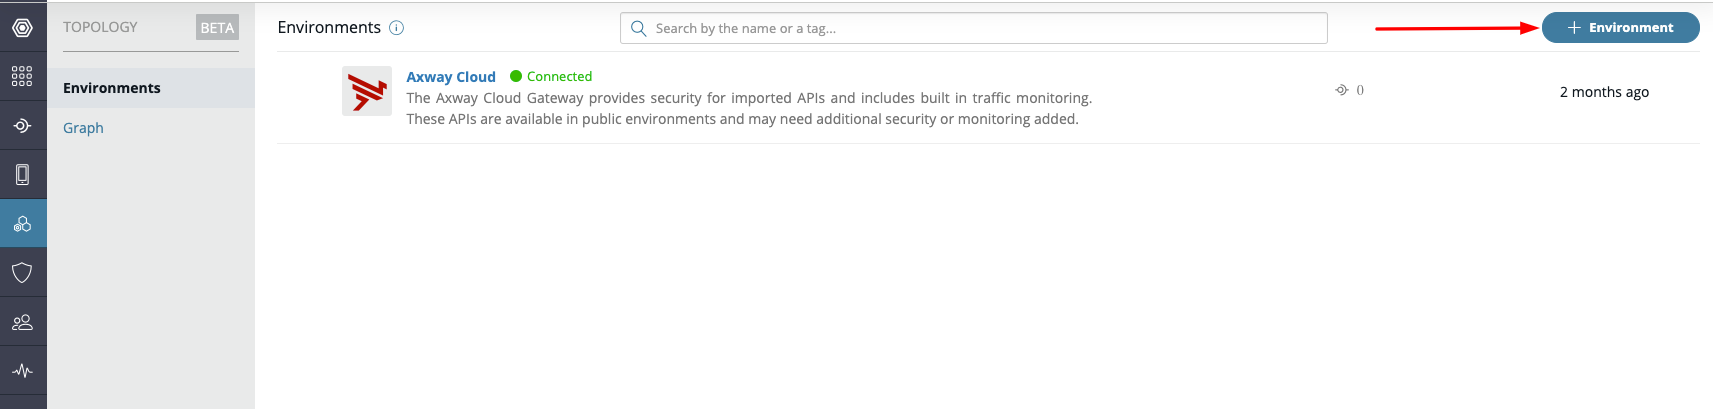
Then click on the left side navigation bar for Topology. It may be necessary to register a new account to have access to the Topology menu option.

Then click on the top right button for "+ Environment".
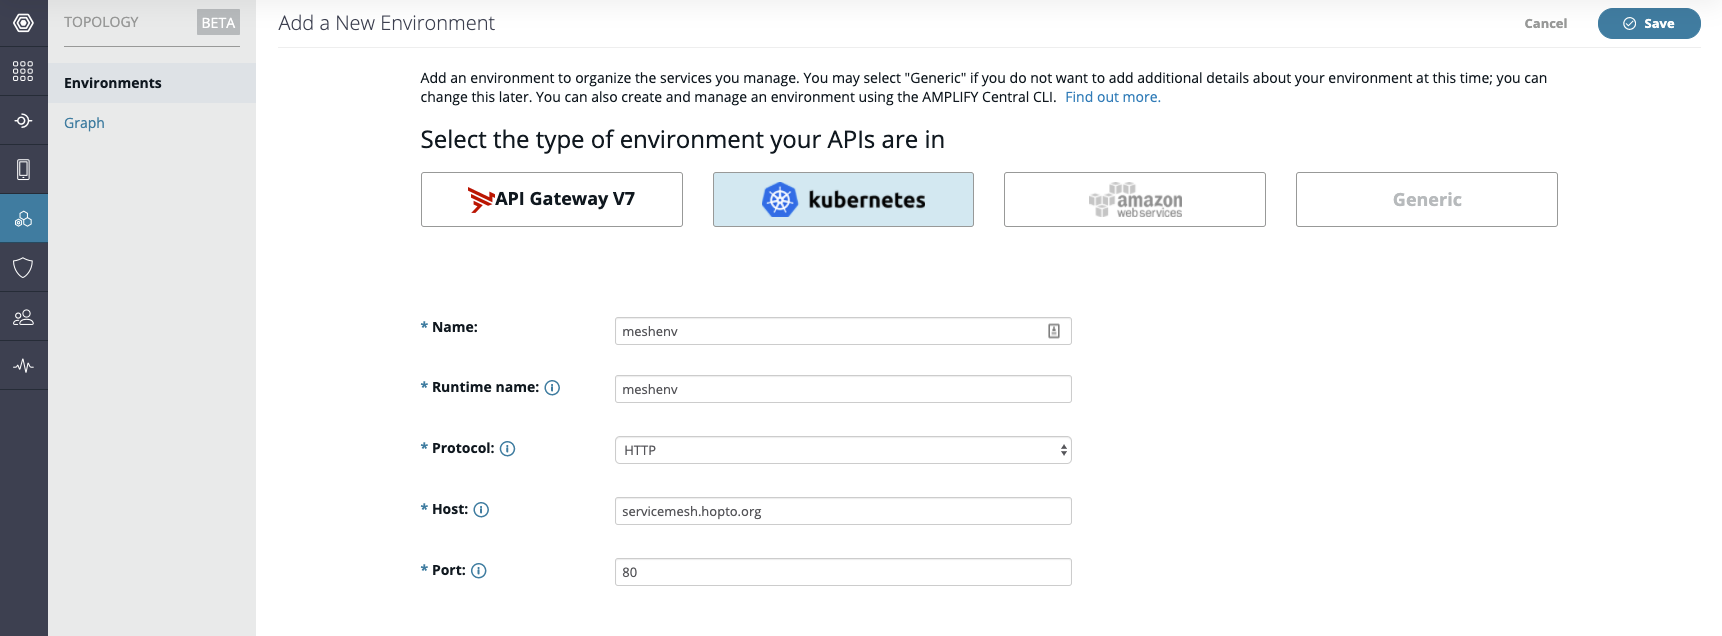
In this setup example, we will create an HTTP gateway.
Note: HTTPS gateways are supported. You can select the HTTPS Protocol only if a CA cert has been stored in your cluster (see Step 3, APIC Prerequisites).
Enter an Environment name (e.g. meshenv) and Runtime group name (e.g. meshenv), Protocol is HTTP.
The host name entered here should be the public domain name for your cluster and should match the secret previously created in your istio-system namespace to store your domain edge gateway certificate (e.g. <PUT_YOUR_SECRET_NAME> from 3.2.2).
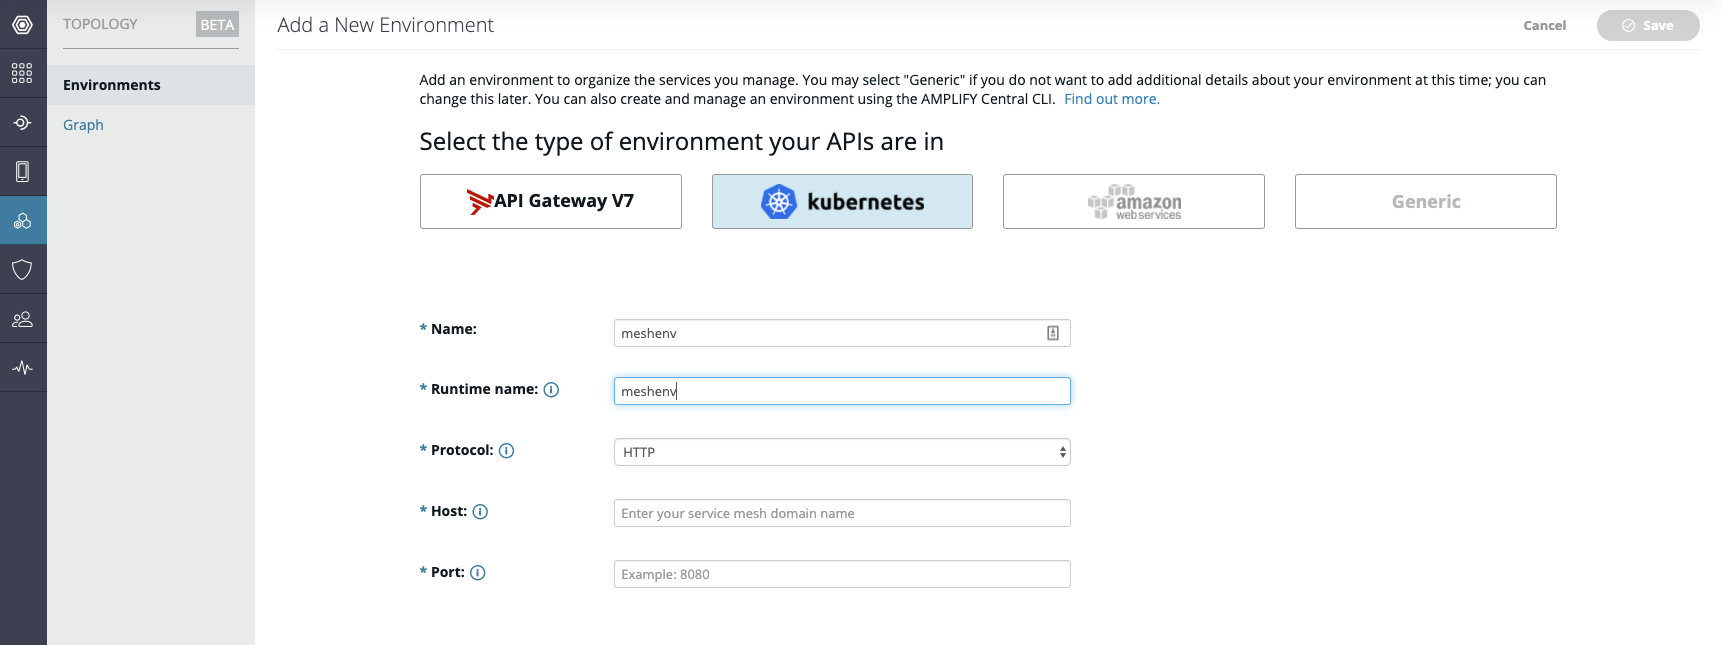
After completion of the remaining fields (e.g. Host=servicemesh.hopto.org, Port=80), click on the Save button in the top right corner.
The next screen provides instructions on how to download and install the Hybrid Kit.
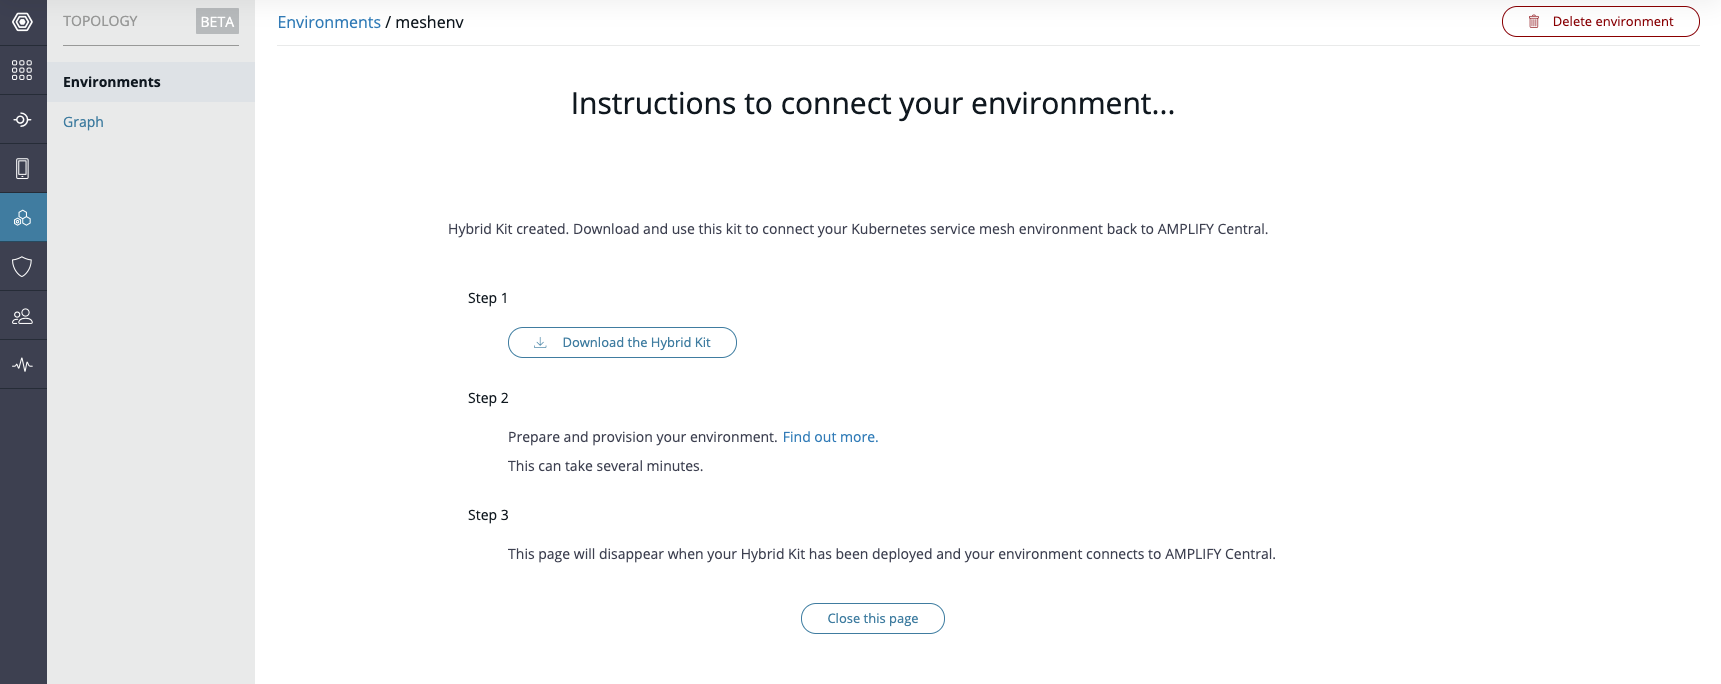
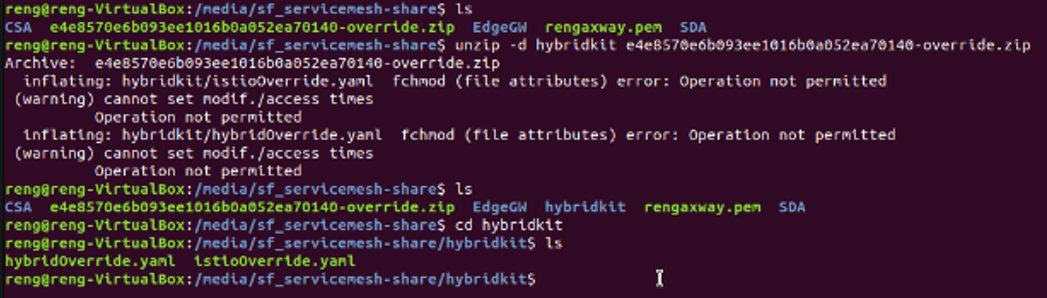
Click the Download the Hybrid Kit button to download the kit and then move it to a sub-directory created on your Linux client. Unzip the downloaded kit file (e.g. random name ending in "-override.zip) into a sub-directory (e.g. hybridkit) using this command
unzip -d hybridkit xxxxx-override.zip
cd hybridkit
If unzipped successfully, two YAML files will be present and the command line should look as follows
Lets add the Axway helm charts repo. This is needed for the installation of Istio and the service mesh agents (SDA, CSA). You can download them using the following commands
helm repo add axway https://charts.axway.com/charts
helm repo list
helm repo up
Note: The "helm repo up" command is an optional step to make sure the upcoming helm deployments pull the most recent helm chart versions from the Axway helm repo.
If created successfully, the command line should look as follows:

The next step performs the installation of Istio to enable mesh governance (e.g. control the flow of traffic and API calls between services) using this command
Let's install the istio with the following command
istioctl install --set profile=demo -f <pathtooverridefile>/istioOverride.yaml
If created successfully the command line should look as follows:

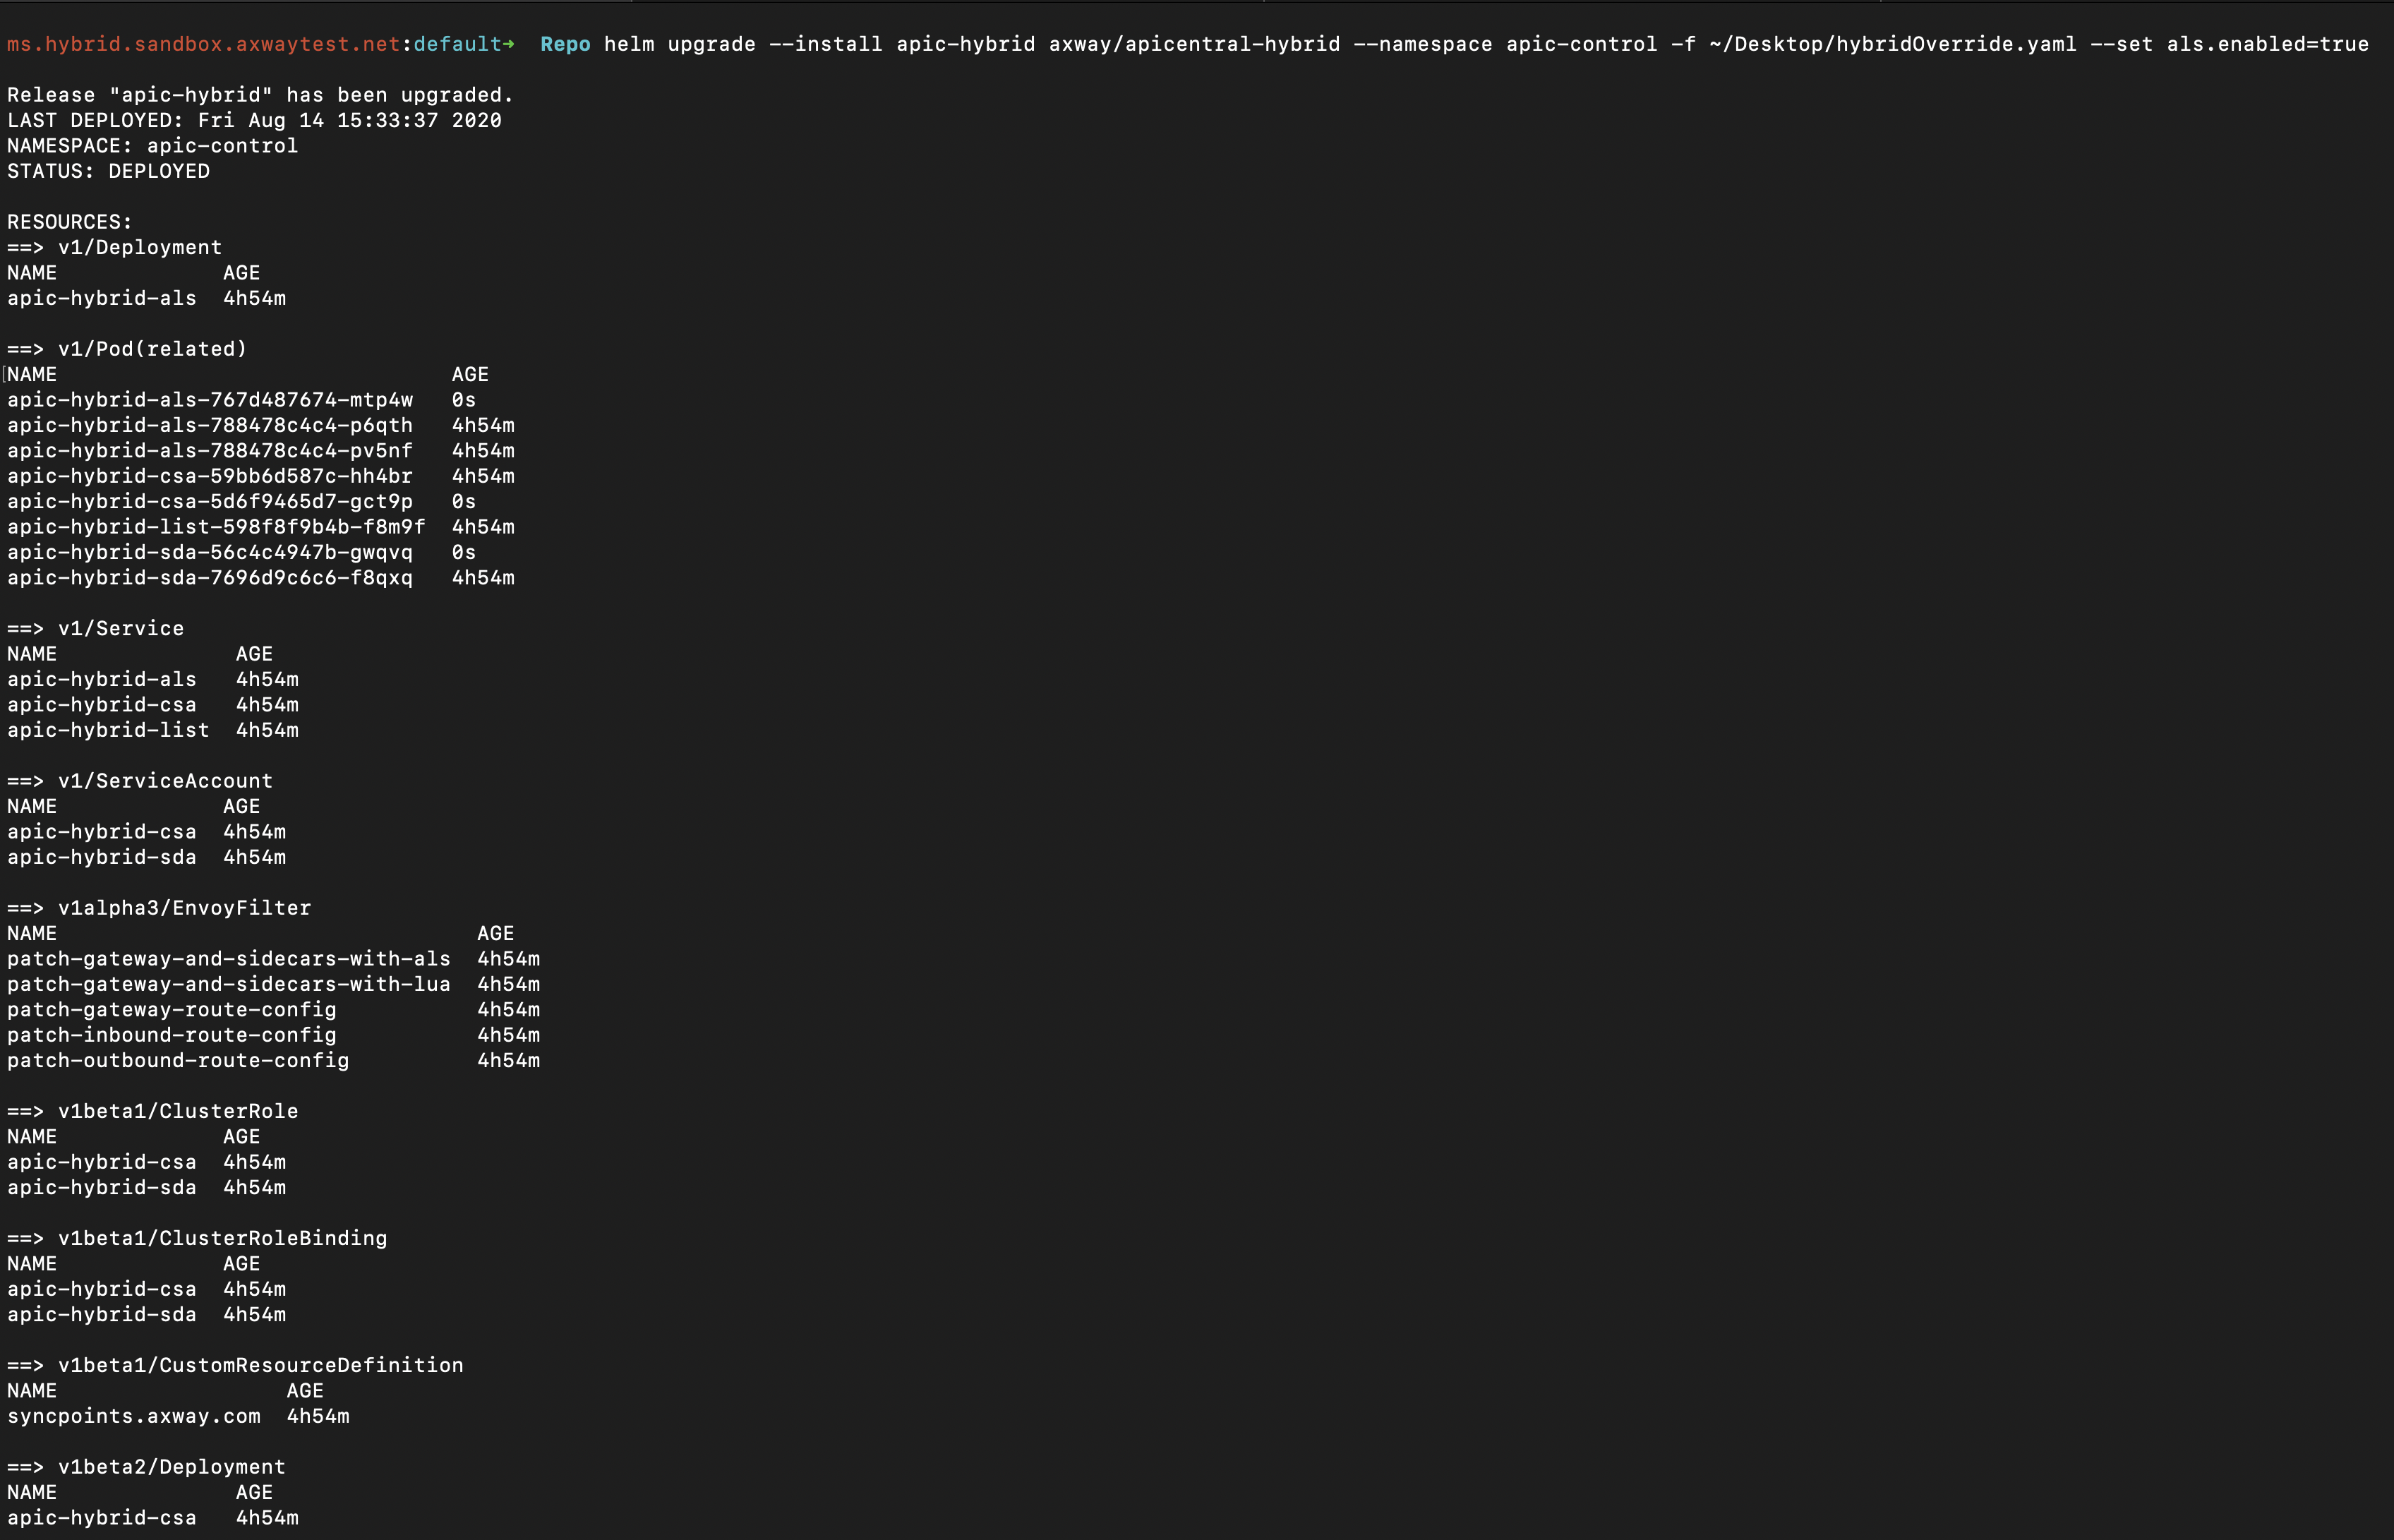
The next step is to install service mesh agents (matching the previously created CSA and SDA secrets) with this command
helm upgrade --install apic-hybrid axway/apicentral-hybrid --namespace apic-control -f hybridOverride.yaml --set als.enabled=true
By default the headers will be displayed in events sent to Condor, but if we want the headers to be disabled then run the following helm command
helm upgrade --install apic-hybrid axway/apicentral-hybrid --namespace apic-control -f hybridOverride.yaml --set als.enabled=true --set als.publishHeaders=false
If this installation step generates an error, go back to the "Download the Hybrid Kit" step because:
- The Hybrid Kit contains information which can expire if not installed in less than an hour.
- The Hybrid Kit is a one-time use for environment setup (i.e. deletion of an environment requires another Hybrid Kit to be downloaded).
If created successfully, the command line should look as follows:
The typical dynamically assigned AWS cluster name is quite long (and random) and causes a few problems for external DNS resolution and communication from AMPLIFY Central to your environment. The following steps provide a simple way to map this to an easier to use external DNS address (the public URL AMPLIFY Central will use).
The following command is to get the DNS address of the Istio Ingress gateway that we have created by checking the Istio services status
kubectl get service -n istio-system
If the Istio services have been installed successfully, the command line should look as follows:

Please make a copy the highlighted DNS name of the "apic-xxxxx-gateway". This will be used to publicly access the Service Mesh.
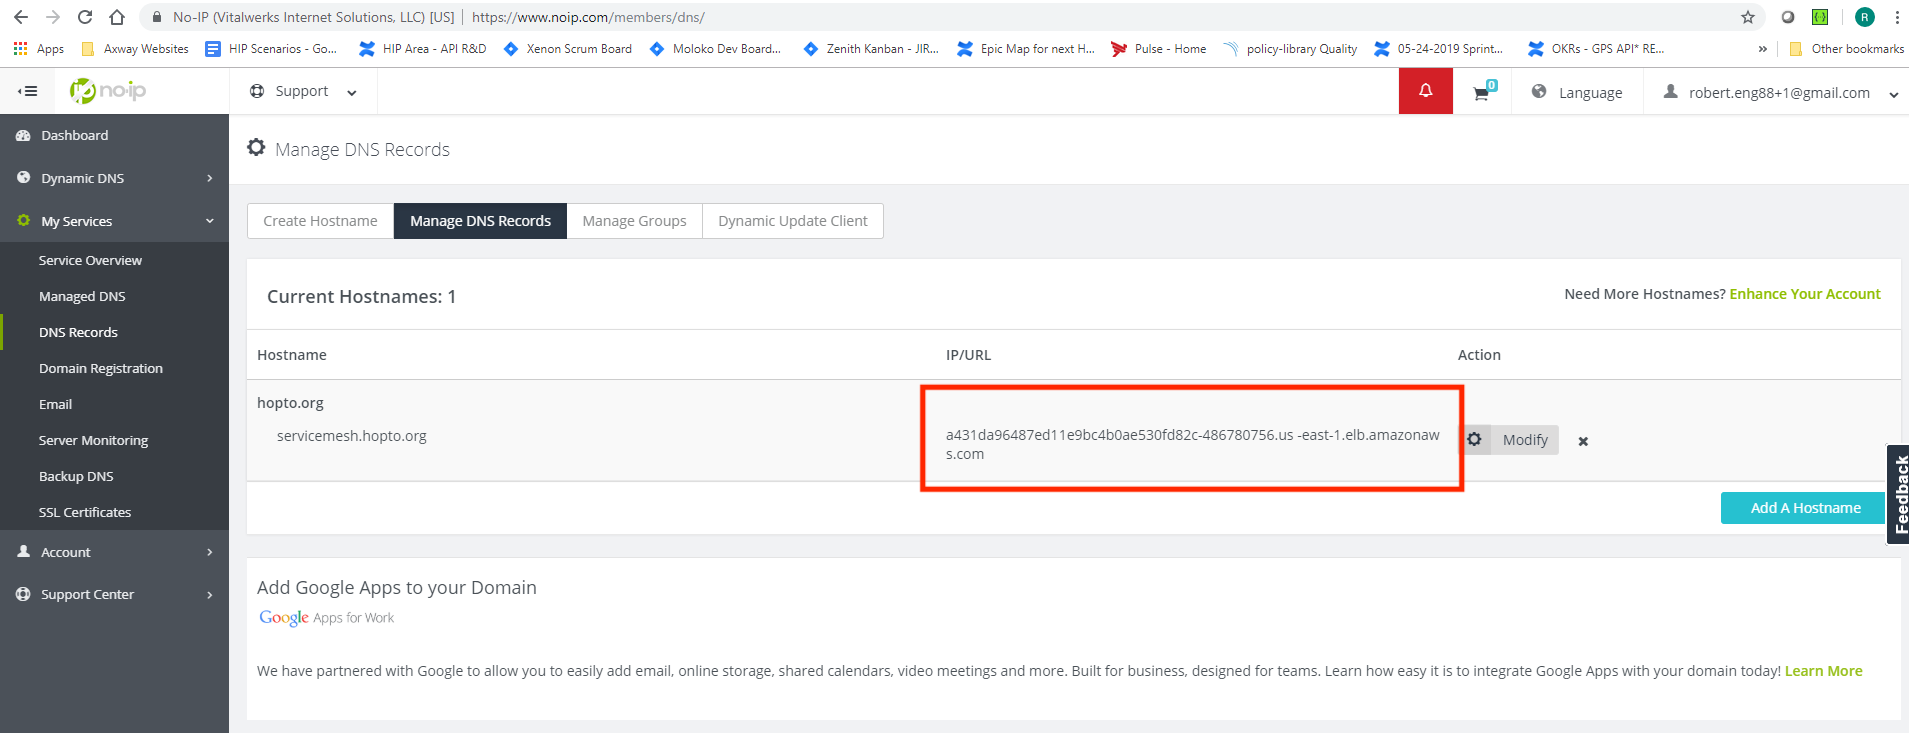
Now the free public DNS at noip.com that we have previously created (i.e. servicemesh.hopto.org) can be updated to point to the Istio gateway.
If you did not previously create a NoIp Hostname record then go to Step 3.1
If you already have a NoIp Hostname record then on your NoIp configuration, go to My Services → DNS Records menu option, select the "Modify" option, and then paste the gateway DNS host name previously copied in IP/URL field.
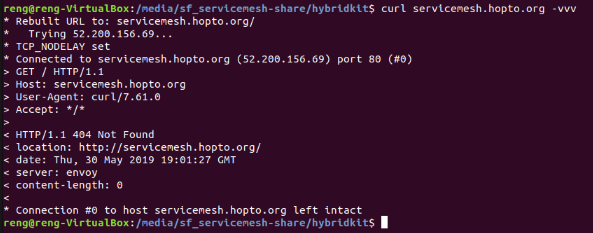
Now a curl command can be used to reach the the public DNS of Amplify Central Gateway (e.g. servicemesh.hopto.org) using the command
curl servicemesh.hopto.org -vvv
The successful connection with HTTP get looks as follows (i.e. host servicemesh.hopto.org left intact) :
Go back to Amplify Central in the browser and click on the left side navigation bar for Topology.
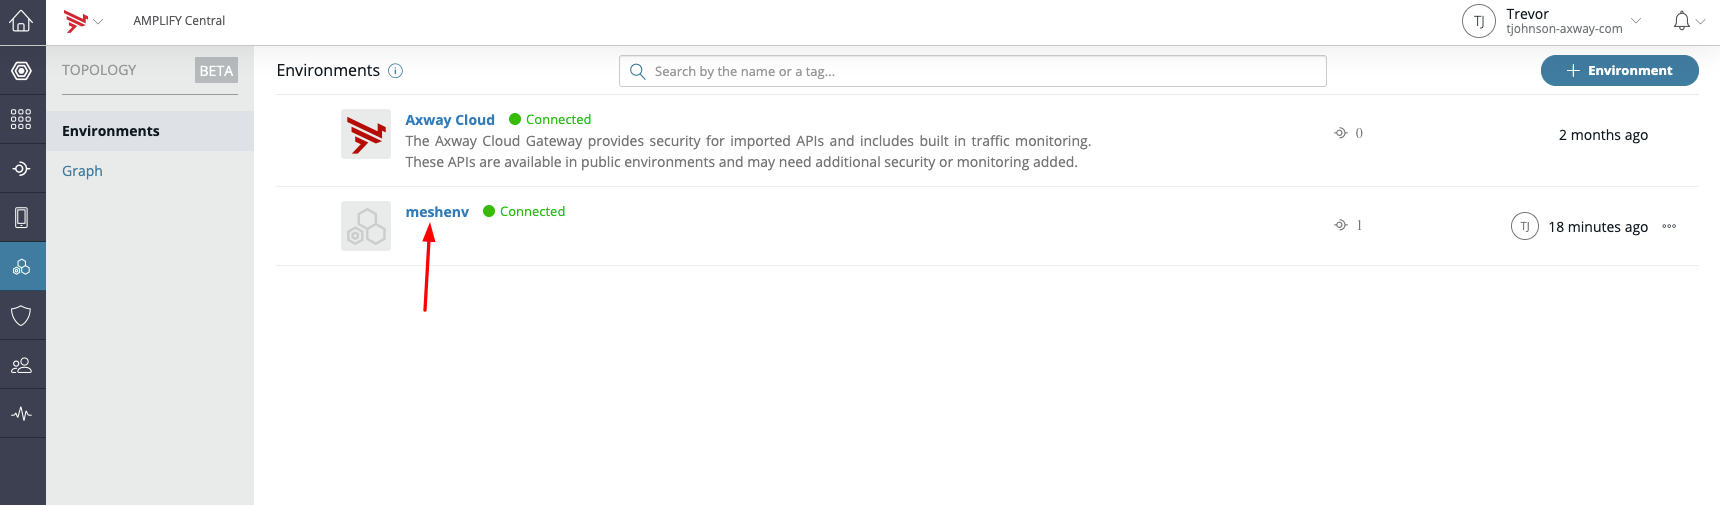
Then click on the 'meshenv' name to see more Environment details.
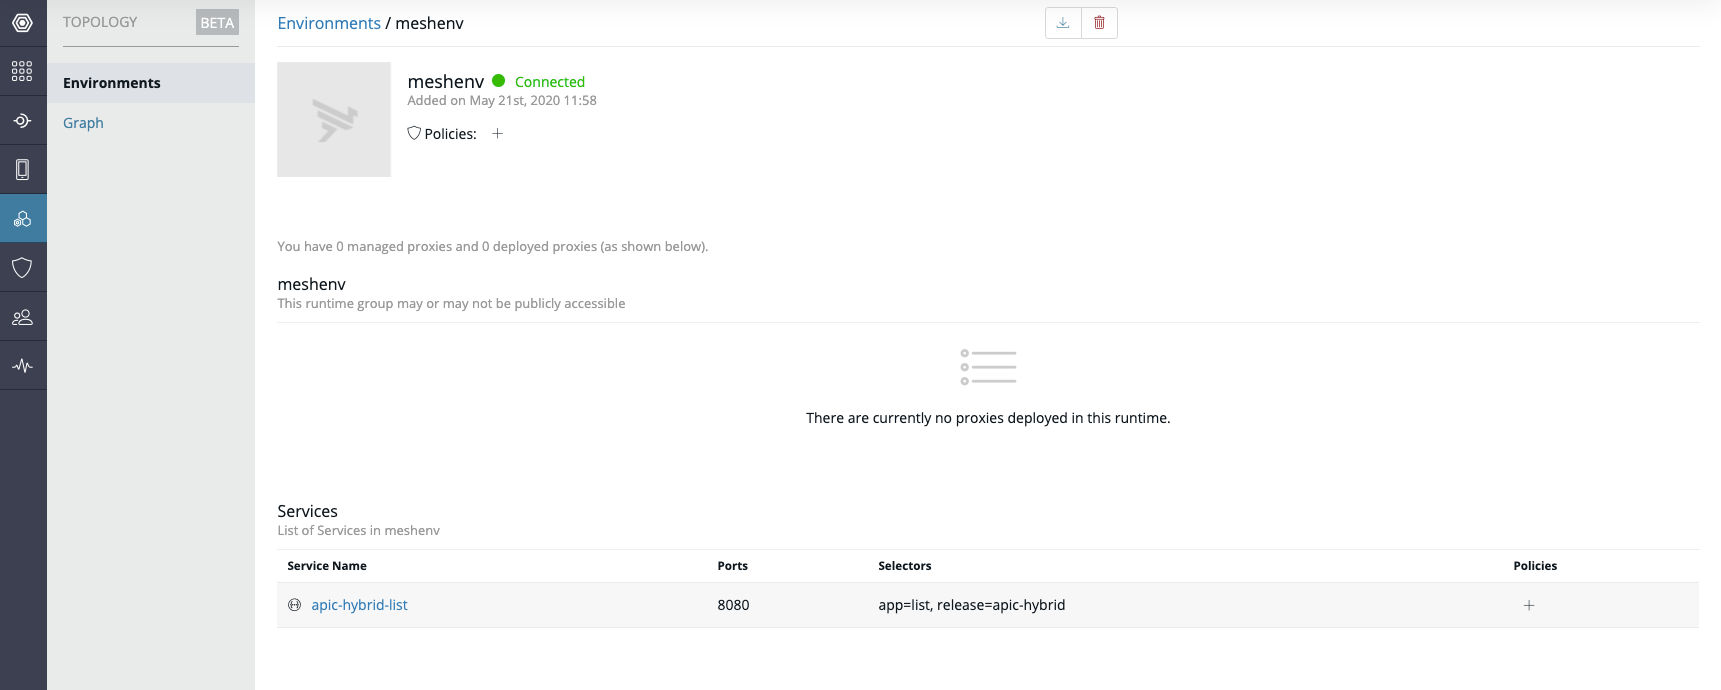
Then click on the service name 'apic-hybrid-list'. In this example, the 'apic-hybrid-list' service was created along with the Mesh Agents deployment for demo purposes.
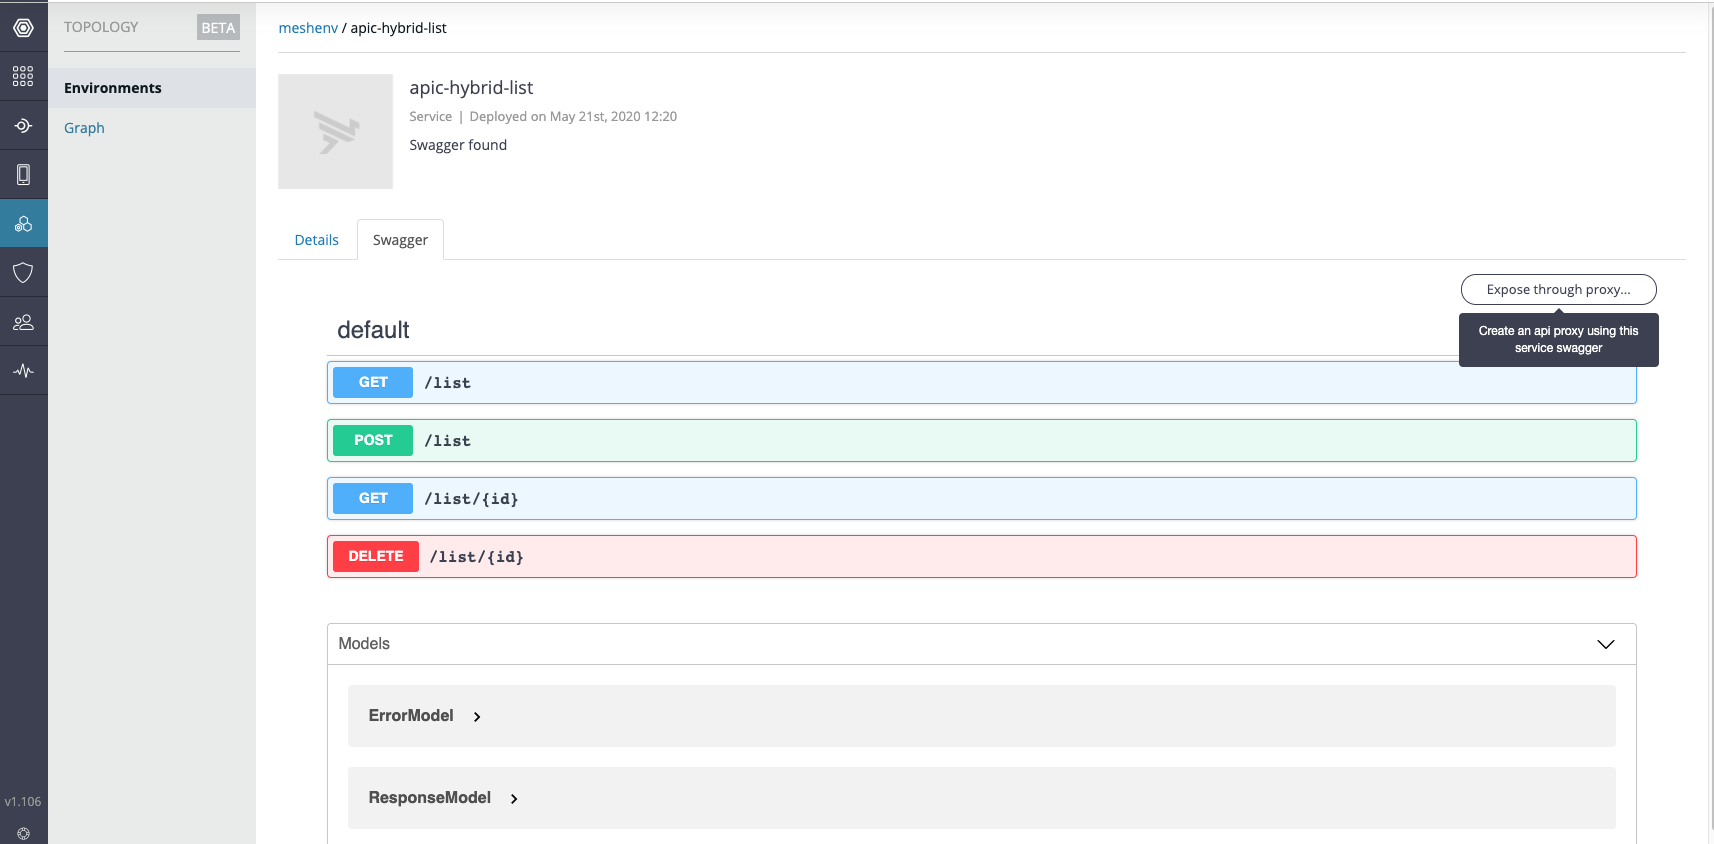
Then click on the Swagger tab and click the 'Expose through proxy' button
It is recommended to change the base path from the default value
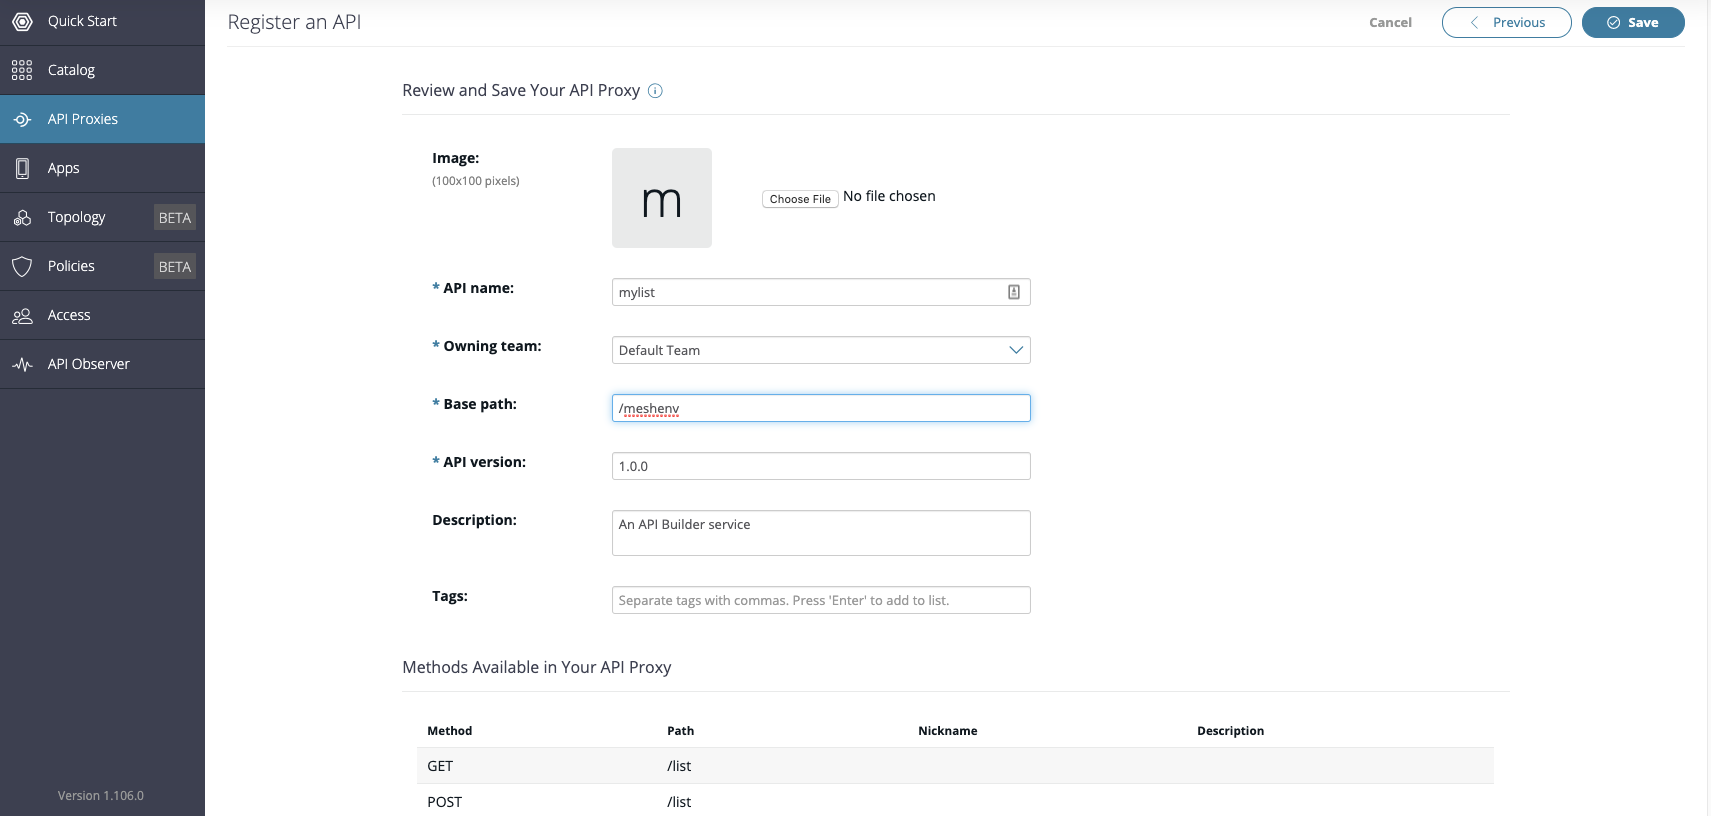
Then click on Save to Register the API in Amplify Central.
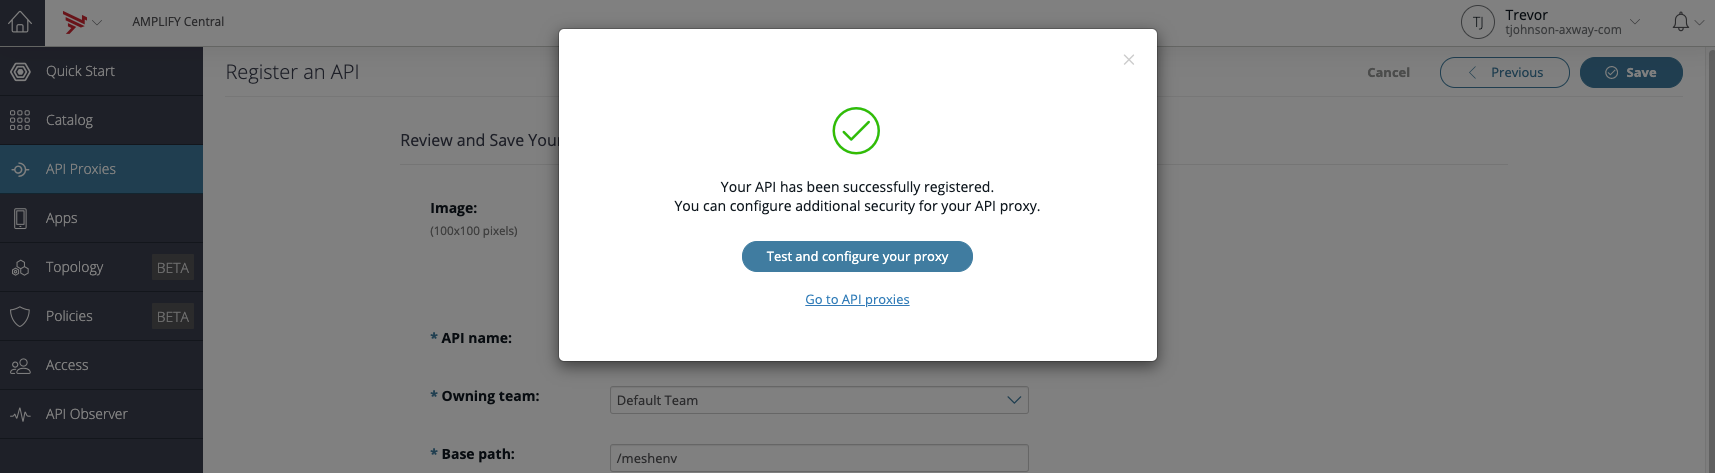
Then click on the "Test and configure your proxy" button
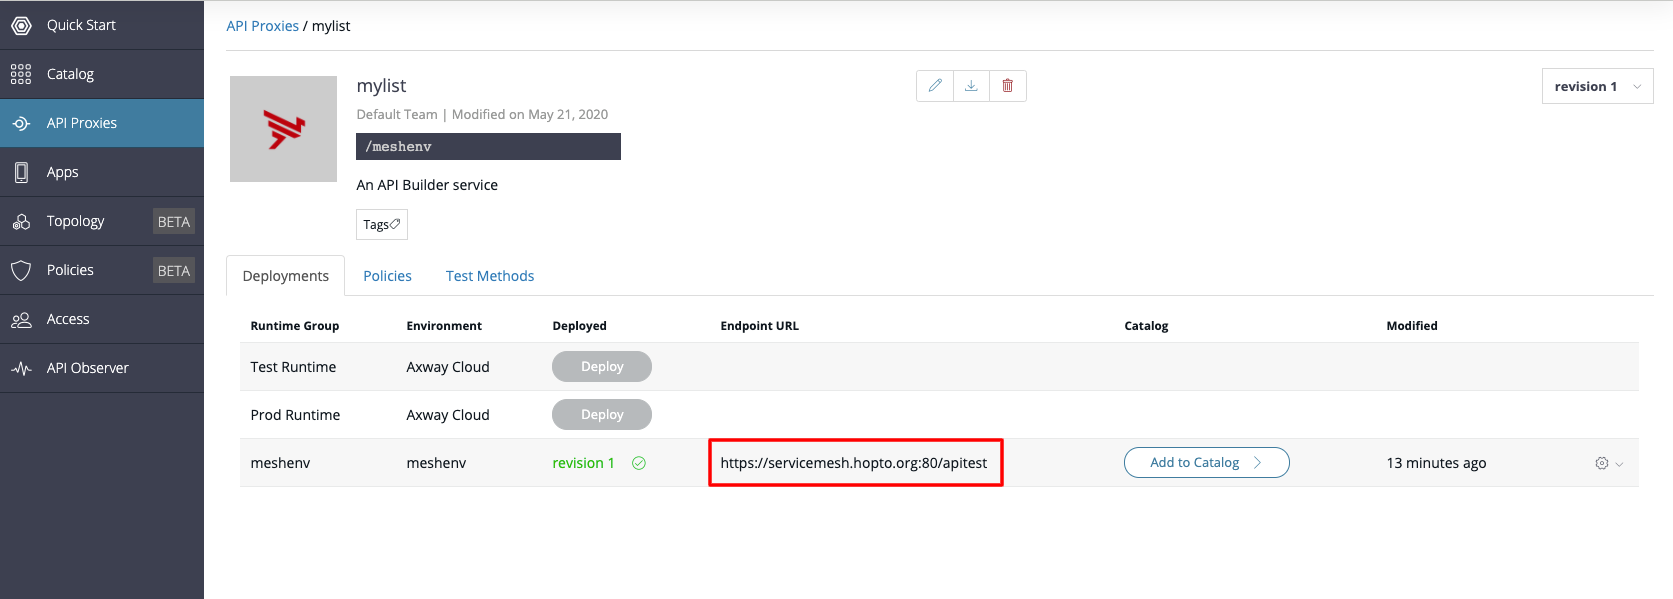
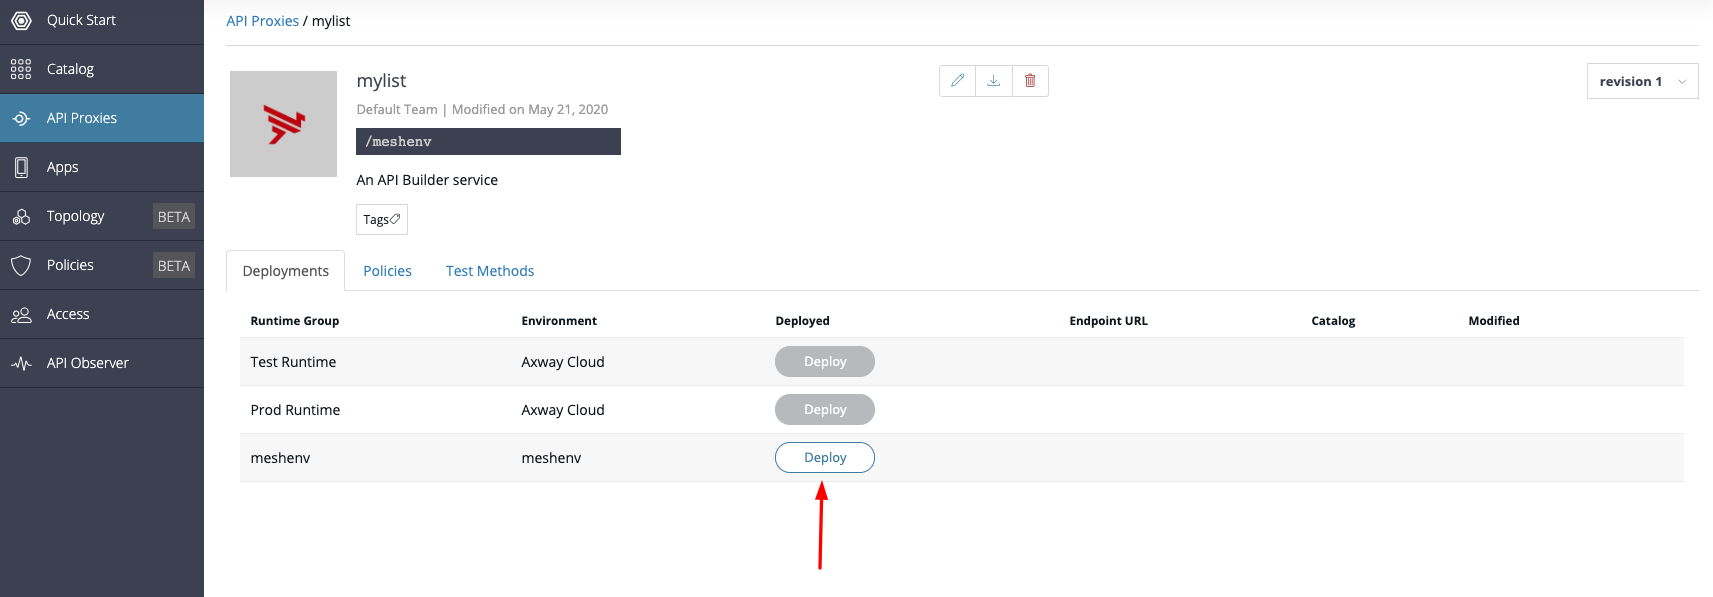 Then click on the "Deploy" button for the "meshenv".
Pick one of the following (HTTP or HTTPS Edge Gateway):
The "Test Methods" tab has a list of methods as shown below. If we had created an HTTPS Gateway with a Trusted CA certificate, you would be able to use the Test Methods from the AMPLIFY Central User Interface.
When Using the self-signed certificate, you will need to add that certificate as trusted in your browser if you want to use the API test for Amplify central directly, You will have to copy the URL for your deployed API into your browser.
Copy the url within the "Endpoint URL" column and paste it into a new tab in the browser.
A warning will appear asking you to trust the self-signed CA. Once you trust the certificate you will be able to go back to Amplify Central and try the APIs of your exposed service.
Go to the "Test Methods" tab to try the APIs

You can also use curl to test the API from the terminal
#If HTTPS with Trusted CA
curl -is -X GET 'https://servicemesh.hopto.org:443/apitest/list'

#If HTTPS with Self Signed CA
curl -k -is -X GET 'https://servicemesh.hopto.org:443/apitest/list'
Congratulations on completing the deployment of the Service Mesh and accessing a registered API using AMPLIFY Central !!!!!!
Here is a link to Step 5
(Skip if you have created an HTTPS Edge Gateway) It is not possible to call an HTTP endpoint from HTTPS (i.e. the AMPLIFY Central UI) for security reasons.
Therefore, it is necessary to test using another client (e.g. CURL command).
To try out a method with curl we can click on one of the methods, and click the "Execute" button. A curl sample will appear. Copy this example and paste it in the terminal.
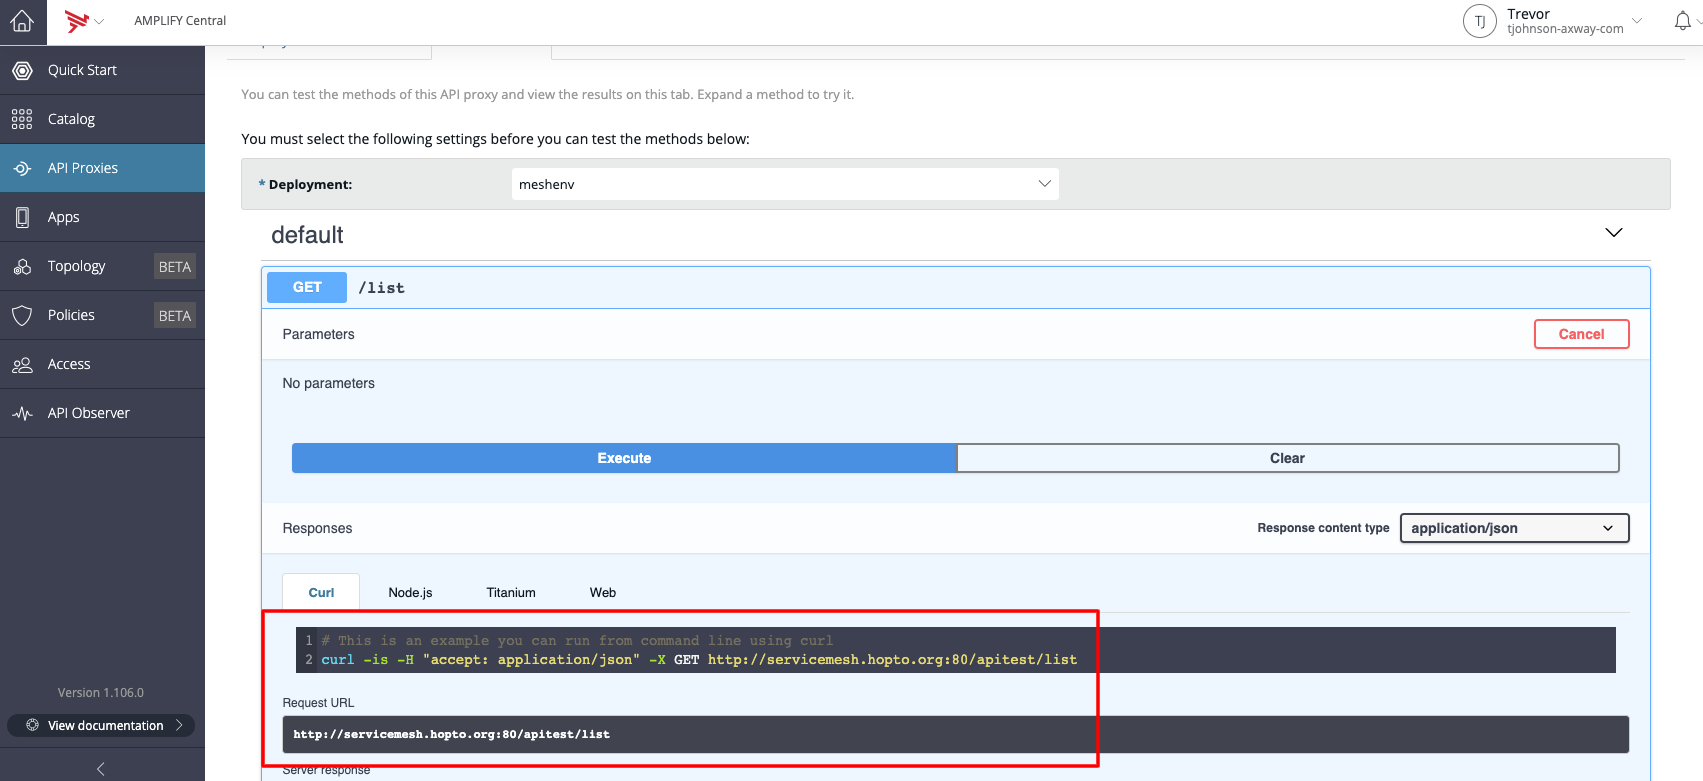
Now a curl command can be used to reach the public DNS of AMPLIFY Central Gateway (e.g. servicemesh.hopto.org) and test the deployed API with an HTTP Get method
#If HTTP (Suggested this tutorial)
curl -is -X GET 'http://servicemesh.hopto.org:80/apitest/list'
The successful API call using the CURL command should look as follows:
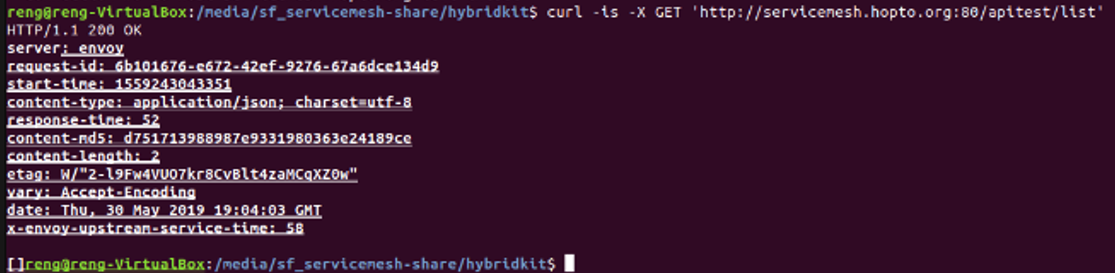
Congratulations on completing the deployment of the Service Mesh and accessing a registered API using AMPLIFY Central !!!!!!
The ALS Traceability Agent (which logs and publishes Transactions) can be configured to sanitize the Transaction information that it publishes i.e Request/Response headers, Query Parameters, Path Segments.
Below is a sample sanitization configuration. Here is a file containing the same configuration: configExample.yaml
als:
  sanitization:
    pathFilters:
    - keyMatch: "list" #Regex to remove path segment "list"
    argsFilters:
      remove:
        - keyMatch: "id" #Regex to remove query parameter "id"
      sanitize:
        - keyMatch: "city"  #Regex to sanitize first three characters of query param "city"
          valueMatch: "^.{0,3}"
    requestHeaderFilters:
      remove:
        - keyMatch: "^x-amplify.*" #Regex to remove all x-amplify headers in Reqheaders
      sanitize:
        - keyMatch: "x-axway"
          valueMatch: "list" #Regex (can be specified as a string literal) to sanitize "list" x-axway headers in Reqheaders
    responseHeaderFilters:
      remove:
        - keyMatch: "x-envoy.*" #Regex to remove all x-envoy headers in Resheaders
      sanitize:
        - keyMatch: "ip"  #Regex to sanitize ip in ResHeaders as per Regex specified in Valuematch
          valueMatch: ".{0,3}$"

# Also Valid Configuration (or to disable all sanitization rules)
als:
  sanitization:
    pathFilters:
    argsFilters:
      remove:
      sanitize:
    requestHeaderFilters:
      remove:
      sanitize:
    responseHeaderFilters:
      remove:
      sanitize:
Path Segments
- "pathFilters" is used to apply apply redaction to path segments in URI path. The "pathFilters" section is an array of "keyMatch" which is used to specify the path segments to be removed from the URI Path. This keyMatch value is a Regex. "pathFilters" can be empty i.e "keyMatch" is not required. However, keyMatch cannot be empty if specified.
Query Parameters
-
"argsFilters" is used to apply redaction to query parameters. "argsFilters" can be empty.
-
Under "remove" section, the user can specify an array of keyMatch Regex to remove query parameters. The "remove" section can be empty i.e "keyMatch" is optional. However, "keyMatch" cannot be empty if specified.
-
Under "sanitize" section, the user can specify the keyMatches Regex of the query parameters to be partially obfuscated. The "valueMatch" is a Regex which specifies the portion that is to be sanitized. For example if only first three characters are to be obfuscated, the "valueMatch" would be "^.{0,3}". The "sanitize" section can be empty i.e "keyMatch & valueMatch" pair is optional. However, both keyMatch and valueMatch have to specified in pairs if non empty.
Request and Response Headers
-
"requestHeaderFilters" and "responseHeaderFilters" are used to apply redaction to request and response headers respectively. Both "requestHeaderFilters" and "responseHeaderFilters" can be empty.
-
Under "remove" section, the user can specify an array of keyMatch Regex to remove headers. The "remove" section can be empty i.e "keyMatch" is optional. However, "keyMatch" cannot be empty if specified.
-
Under "sanitize" section, the user can specify the keyMatches Regex of the headers to be partially obfuscated. The "valueMatch" is a Regex which specifies the portion that is to be sanitized. For example if only first three characters are to be obfuscated, the "valueMatch" would be "^.{0,3}". The "sanitize" section can be empty i.e "keyMatch & valueMatch" pair is optional. However, both keyMatch and valueMatch have to specified in pairs if non empty.
Please put your configurations in a file and then execute the following command.
helm upgrade --install apic-hybrid axway/apicentral-hybrid --namespace apic-control -f <pathToOverrideFile>/hybridOverride.yaml -f <pathToConfigFile>/config.yaml --set als.enabled=true
Please monitor the ALS traceability agent pods have restarted by executing the following command
kubectl -n apic-control get pods
The deployment of ALS traceability agent will not be successful if there is an invalid configuration provided. If there is an error in the pods after executing the command above you can check the log by executing the following command
kubectl -n apic-control logs <podName>
The logs should display the configuration error. Fix the configuration and repeat the steps above.
Here is a link to Step 5