Step 2. Create a Kubernetes cluster with Kops
These steps are based on having a Linux client available and the required tools to manage an AWS EC2 instance.
As a pre-requisite to be able to create a Kubernetes cluster, your must have the following AWS IAM permissions:
- Amazon EC2FullAccess
- AmazonRoute53FullAccess
- AmazonS3FullAccess
- IAMFullAccess
- AmazonVPCFullAccess
To create a Kops cluster, you need to have an SSH key on your machine, create one using the following command (default values can be used)
ssh-keygen -t rsa -C "[email protected]"
An S3 bucket is a public cloud storage space in the AWS Simple Storage Service (S3) and used (in our context) to store and manage k8s cluster state. An S3 bucket can be shared and re-used by many AWS/K8s clusters that are created against the same AWS account. If you do not have an existing one for this purpose, you will need to create a new one.
Please follow the link to create a new AWS account.
From the terminal of a Linux client (e.g Ubuntu Linux), please type the following Linux commands.
Lets first confirm that we can access the S3 service and show what S3 buckets exist with this command
aws s3 ls
In the example below, a s3 bucket named 's3mesh' in the 'us-east-1' region of AWS is created. If you encounter an 'access denied' or 'bucket already exists' error after the 'create-bucket' command, please choose a different and unique name for your s3 bucket (refer to this link for bucket restrictions).
If you have an existing s3 bucket available for use, only execute the 'export bucket_name=' command then skip to 'How to create a Kops Kubernetes Cluster".
Note: The '--create-bucket-configuration LocationConstraint=' parameter may be needed depending on your region. Refer to this link for details Create Bucket Guide.
Type the following two commands to create the s3 bucket
export bucket_name=s3mesh #Pick your own bucket name
aws s3api create-bucket --bucket ${bucket_name} --region us-west-1 --create-bucket-configuration LocationConstraint=us-east-1 # Change the AWS region accordingly if you are using a different one.
If created successfully, the command line should look as follows (the Location may appear differently based on the LocationConstraint):

Lets enable the s3 bucket versioning with this command
aws s3api put-bucket-versioning --bucket ${bucket_name} --versioning-configuration Status=Enabled
If created successfully, you will be able to see the 's3mesh' bucket. The command line should look as follows after using the 'aws s3 ls' command to view the s3 buckets:

Let's create a cluster named 'cluster.mesh.k8s.local' using a minimum size of a t2.large with 3 nodes in the us-east-1a zone (select your zone according to your region), you can pick any name as long as it ends with .k8s.local (for gossip mode). Our Axway mesh implementation (deployment steps coming up in later sections...) uses Istio/Envoy, so this is the minimum instance size at this time. and we will show how to assign a public dns to the cluster in a later step in this series.
Let's create the cluster with these next four commands. We will specify the kubernetes version as 1.15.11.
Note: Kubernetes 1.16.0 is also supported.
export KOPS_CLUSTER_NAME=cluster.mesh.k8s.local # Your cluster name should always end with .k8s.local (for gossip mode)
export KOPS_STATE_STORE=s3://${bucket_name}
kops create cluster --kubernetes-version 1.15.11 --node-count=3 --node-size=t2.large --zones=us-east-1a --name=${KOPS_CLUSTER_NAME} #Pick a zone that belongs to your region, for example, if your awscli is setup to use us-west-2, pick a zone us-west-2a
kops update cluster --name cluster.mesh.k8s.local --yes
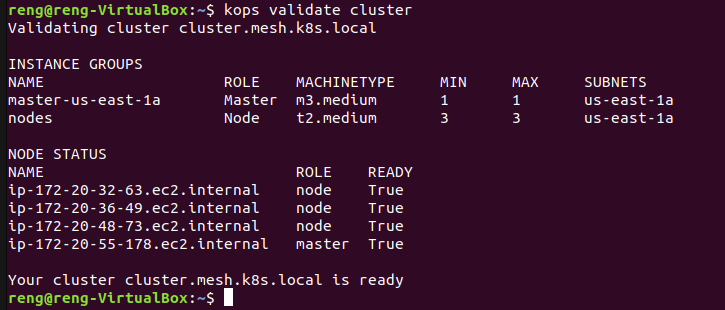
After the 'kops update cluster' command, please wait about 5 to 15 minutes for the cluster to be ready. Check on the cluster status with this command
kops validate cluster
All k8s masters and nodes should be running and have "Ready" status. The Component status returns healthy for all components. All pods in the kube-system namespace are running and healthy.
The command line should look as follows:
Congratulations on completing the creation of a kubernetes kops cluster.
Here is a link to Step 3