Document and share progress to convert a FLSUN T1 Pro to T1 πro.
- Replace the stock host board (Core Board) with a Raspberry Pi
- Replace the stock screen with Fysetc Raspberry Pi 5 inch DSI Display
- Document stock hardware connections for troubleshooting/upgrades
- Reuse other stock hardware as much as practical
- Clean installation
- Up to date OS and Klipper Ecosystem
-
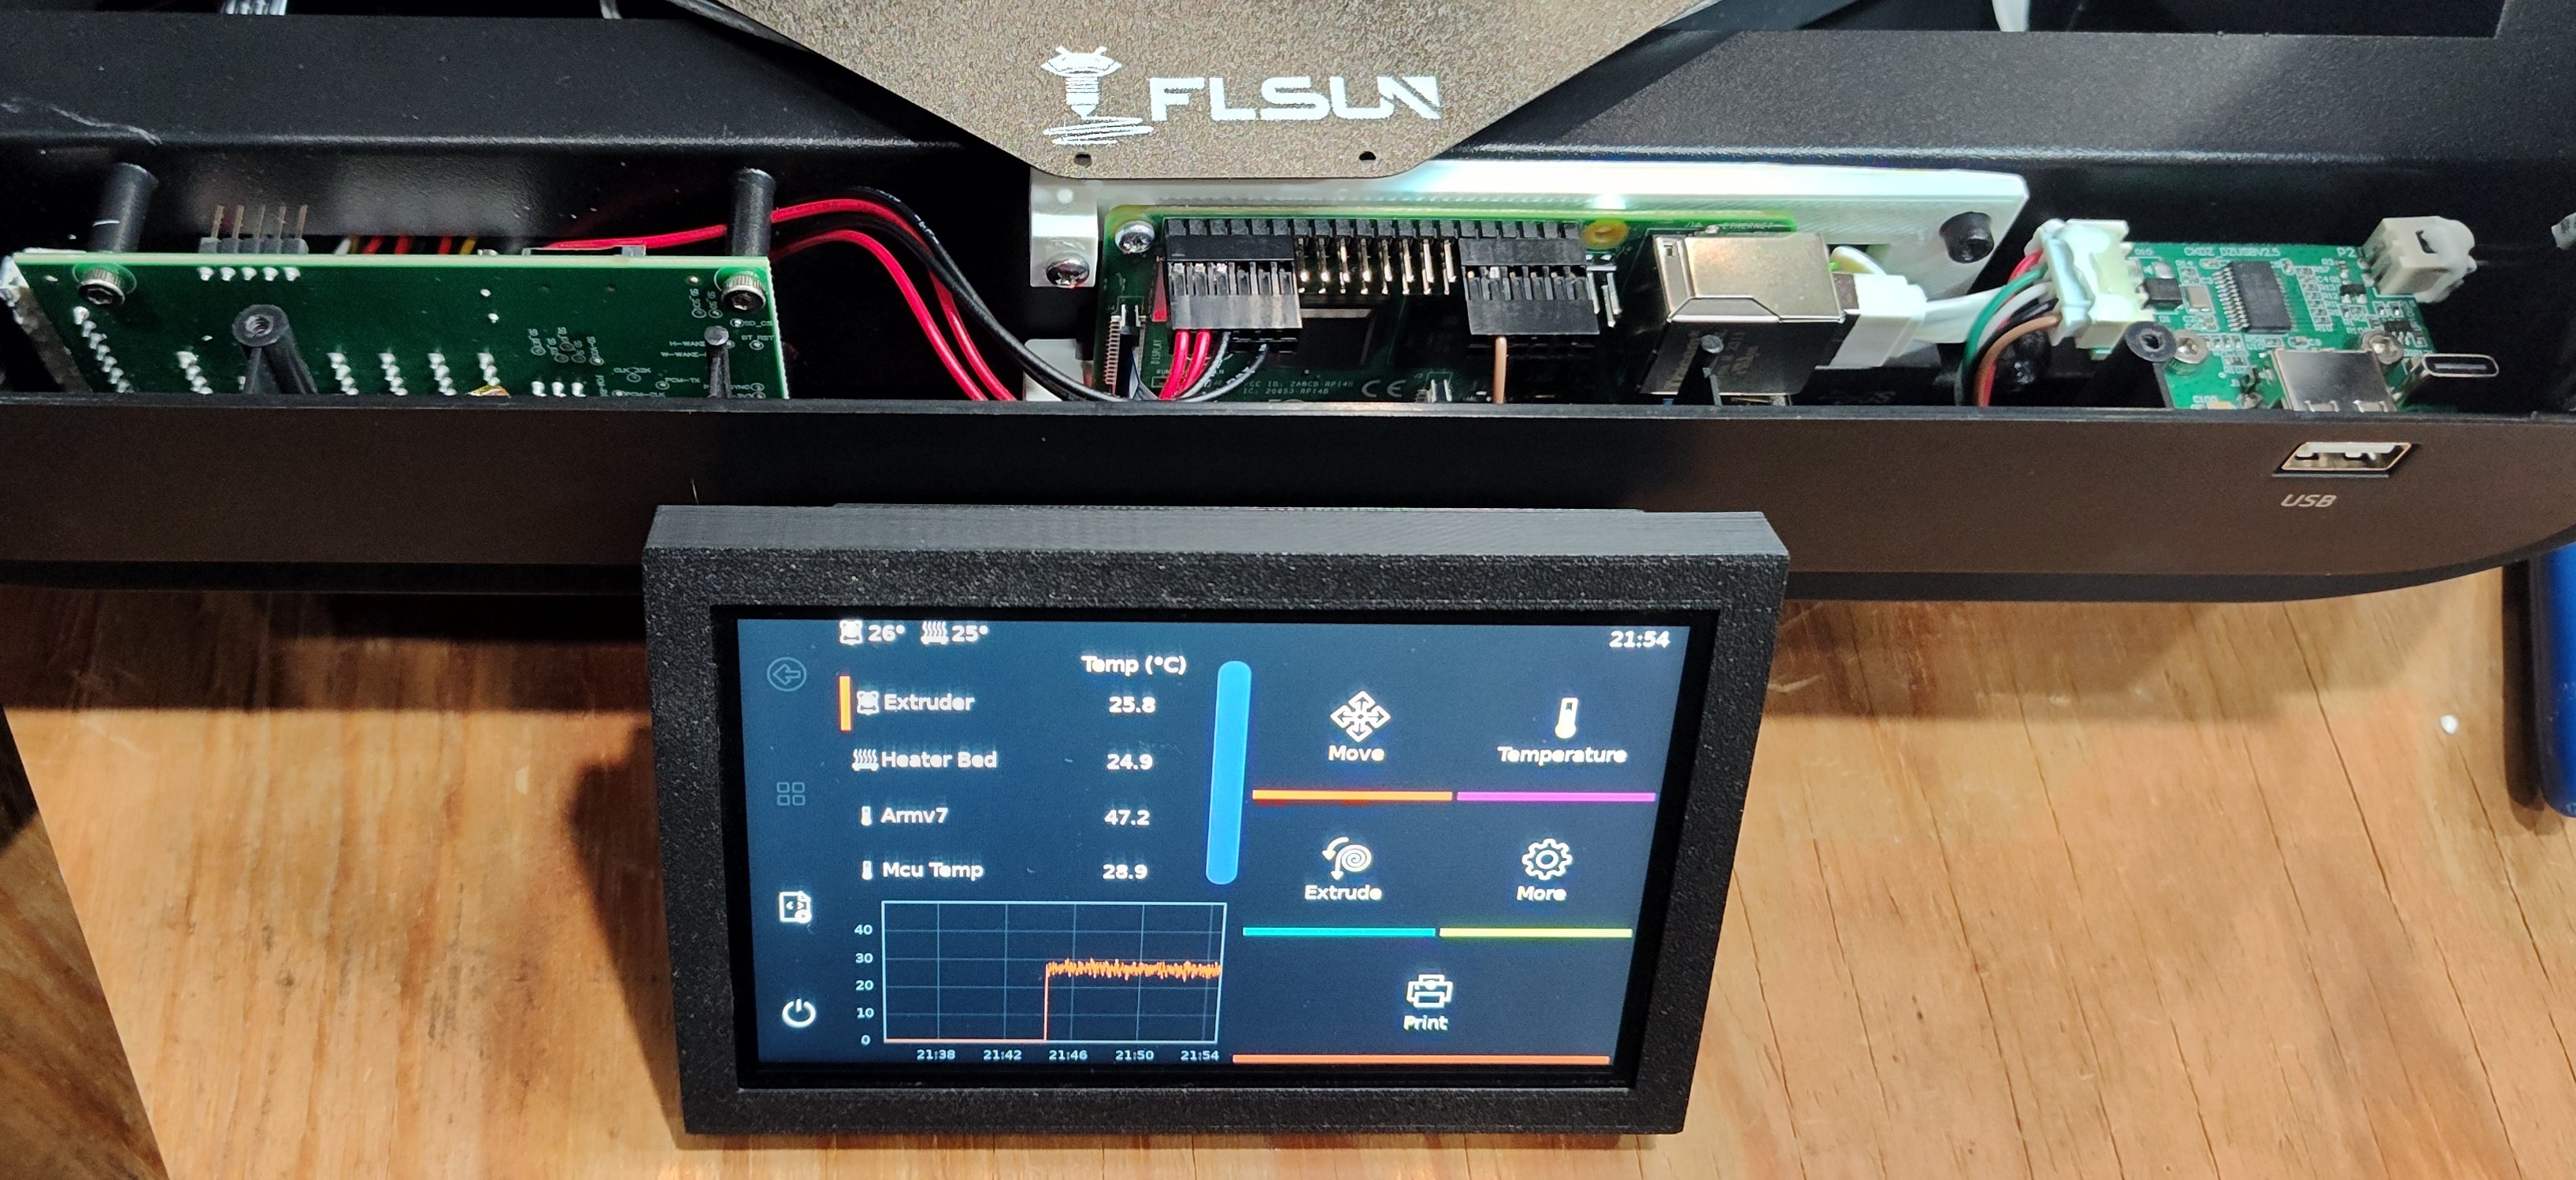
Pi 4 and the screen installed, fully operational
-
Uses the stock 5v power supply on lower adapter board for Pi
-
USB camera hub board reused by Pi
-
Currently irreversible after flashing Klipper MCU hardware
-
[load cell] community testing branch working with stock lower function adapter board
before: range 0.046875, average -0.420110, stDev 0.010482, average delta: 0.011671after: range 0.002557, average -0.304737, stDev 0.000692, average delta: 0.000532
-
Macros need a lot of work
-
Help wanted, contributions welcomed
My original T1 Pro was a Gen2, second T1 Pro purchased opened box was Gen1. The Gen1 has older revision PCBs. The Gen1 motherboard came with BTT stepper drivers vs FLSUN brand on Gen2. BTT silk screen painted over in green even though the spare part clearly displayed the BTT marking on the website. The Gen2 motherboard has some changes from the Gen1, Gen1 lacks the 5 pin firmware download header and a bunch of transistors under the steppers. Gen1 has some pin header jumpers under the steppers that are not on Gen2.
The lower function adapter board on Gen1 has the low noise ADC chip bodged onto the back of the PCB and held with copious amounts of the white silastic.
The Gen2 CPAP fan aligned with the air hole opening in the top cover. The Gen1 did not and sucked air in from inside the enclosure.
Gen1 also looks to have an older effector pcb, haven't taken that apart yet to document.
- Fully open source Klipper ecosystem
- No power loss protection
- Ethernet connection possible, not just wifi
- Slightly bigger screen with more control
- Potential for Load cell probe accuracy improvements
- Cleanup the printer.cfg file and macros
- Create Schematic (in progress)
- Trace motor SPI connections
- Document lower adapter board
- Fix lower adapter board usart1 rx/tx
- Document effector PCB and determine cable pinout
- Document πro custom cables
- Hotend thermistor noise at ambient temps
- Make a scripts for mcu fw compile and katapult deploy
- moonraker timelapse
- Document modifications to improve bed probe performance
- Slay underbed dragons (potential regions were probe will not trigger as two load cells readings are exactly balanced out by 3rd load cell reading)
- Modification for filament movement sensor
- Better camera (mine broke already)
- Chamber temperature, RH, sensor
- Chamber heater support
- Improve boot speed of Pi
- Does Pi need heatsinks or extra cooling
- Overlay file system or similar to make more robust to power loss
- Installation guides
- Logo
- Standard preinstalled Pi image
- Redesign the screen bracket
- Find stock firmware for the motherboard MCU
- Stock firmware for the probe MCU
Fusion360 models and STL located on pintables:
https://www.printables.com/model/1191414-flsun-t1-pro-pi-and-screen-bracket
- Custom cable from a Pi usb connector to the stock Usb hub board
- Custom cable from the stock lower adapter board 5v to the Pi GPIO
- Details
- USB Extension cable for MCU (Type A male to Type C female)
- Optional for Ethernet
- Low profile connector cable
- Bulkhead connector
- Industrial / rugged SD card for Pi
- SD card for flashing upper core board firmware
- ST Link v2 clone or similar SWD debugger (Required for [load_cell], recommended for katapult install on motherboard MCU)
- Some assorted M2, M2.5 and M3 screws are needed for assembly
Current high level guide to implement:
- Get Pi setup and Klipper installed and tested before physical install into machine
- Print the brackets for printer installation
- Make the custom cables
- Remove stock host PCB (Core board) and screen
- Install Pi and 5" screen
- Flash Klipper firmware to motherboard
- [Optional for load cell] Modify lower function board with jumper and flash Klipper firmware to lower function board
Details:
-
Fresh Bookworm Install: Use Raspberry Pi Imager software to install Raspberry Pi OS Lite (64-bit) to the SD card Current release is 2025-05-13. Tested with 2024-11-19.
-
Edit settings to set desired host name, password, and wifi configuration
-
Modify the Pi config.txt
# Uncomment some or all of these to enable the optional hardware interfaces
dtparam=i2c_arm=on
#dtparam=i2s=on
#dtparam=spi=on

# Enable audio (loads snd_bcm2835)
dtparam=audio=on

# Enable pwmchip sysfs interface
dtoverlay=pwm-2chan,pin=12,func=4,pin2=13,func2=4

# Automatically load overlays for detected cameras
camera_auto_detect=0

# Automatically load overlays for detected DSI displays
display_auto_detect=1

# Automatically load initramfs files, if found
auto_initramfs=1

# Don't have the firmware create an initial video= setting in cmdline.txt.
# Use the kernel's default instead.
disable_fw_kms_setup=1

# Run in 64-bit mode
arm_64bit=1

# Disable compensation for displays with overscan
disable_overscan=1

# Run as fast as firmware / board allows
arm_boost=1

[cm4]
otg_mode=1

[cm5]
dtoverlay=dwc2,dr_mode=host

[all]
enable_uart=1
Note
Potential issues with touchscreen and wifi firmware. I did not encounter any issues with the wifi.
sudo apt remove firmware-brcm80211
sudo apt-mark hold firmware-brcm80211
sudo reboot now
-
First boot, use SSH or usb keyboard to update
sudo apt update sudo apt upgrade sudo systemctl disable systemd-networkd-wait-online.service sync sudo reboot now -
Install ts_lib for touch calibration
sudo apt-get install libts-bin sudo ts_calibrate sudo ts_test sync sudo reboot now -
Install Git, KIAUH, Klipper, moonraker, mainsail, klipperscreen, crowsnest, klipper-backup,
sudo apt-get install git cd ~ git clone https://github.com/dw-0/kiauh.git ./kiauh/kiauh.sh -
Optional for [load_cell] support: switch to load-cell-probe-community-testing fork
echo "For KIAUH v5"
cd ~/kiauh
nano klipper_repos.txt

echo "For KIAUH v6"
cp default.kiauh.cfg kiauh.cfg
nano kiauh.cfg
add this to file and save:
https://github.com/garethky/klipper,load-cell-probe-community-testing
switch klipper branch in kiauh to the load cell testing repository
-
Install extra python packages for Measuring Resonances and Load_Cell
sudo apt install python3-numpy python3-matplotlib libatlas-base-dev libopenblas-dev python3-scipy python3-serial ~/klippy-env/bin/pip install -v "numpy<1.26" ~/klippy-env/bin/pip install -v "scipy" -
Optional for [load_cell] support: Setup load cell probe debug tool
-
Install ST-Link
sudo apt install gcc build-essential cmake libusb-1.0-0 libusb-1.0-0-dev libgtk-3-dev pandoc -y cd ~ git clone https://github.com/stlink-org/stlink.git cd stlink make clean && make release sudo make install sudo ldconfig -
Install katapult
cd ~ git clone https://github.com/Arksine/katapult -
Install timelapse
cd ~/
git clone https://github.com/mainsail-crew/moonraker-timelapse.git
cd ~/moonraker-timelapse
make install
# moonraker.conf [update_manager timelapse] type: git_repo primary_branch: main path: ~/moonraker-timelapse origin: https://github.com/mainsail-crew/moonraker-timelapse.git managed_services: klipper moonraker -
No login shell (required for load_cell) and Wifi enabled (optional)
sudo raspi-config- Setup wifi under System Options
- Select wifi country in Localizations Options
- Enable serial uart, no console
- Interface options
- Serial Port
- No login shell
- Yes hardware enabled
sudo nmtui- Check wifi setup and add additional networks if desired
-
Enable host mcu
-
Setup hardware PWM using this guide https://www.klipper3d.org/RPi_microcontroller.html
-
The case light gets connected to PWM0 with it routed it to gpio12.
-
/etc/rc.local will need to be created, don't forget the #! and chmod +x
#!/bin/sh -e

# Enable pwmchip sysfs interface
echo 0 > /sys/class/pwm/pwmchip0/export
echo 1 > /sys/class/pwm/pwmchip0/export

exit 0
-
-
Modify printer.cfg
- Copy the printer.cfg from this repository and update with your existing calibration (endstops, bedmesh, PID, etc)
- or.. edit your printer.cfg to remove all the FLSUN additions
-
Build motherboard MCU firmware
sudo service klipper stop
cd ~
cd klipper
make clean
cp ~/motherboard.menu.config .config
make menuconfig
make
cp out/klipper.elf ~/motherboard.elf
cp out/klipper.bin ~/motherboard.bin
./scripts/update_mks_robin.py out/klipper.bin ~/Robin_nano35.bin
cp .config ~/motherboard.menu.config
sudo service klipper start
Note
Motherboard MCU menuconfig settings:
- Enable extra low-level configuration options
- Micro-controller Arch (STM32)
- Processor model (STM32F103)
- Bootloader offset (28KiB Bootloader) for SD card flash
- Bootloader offset (8KiB bootloader) for Katapult
- Clock Reference (8 MHz)
- Communication interface (Serial (on USART3 PB11/PB10))
- (250000) Baud for serial port
- Enable step on both edges
- PE8 (pins at startup for heatsink cooling fan until klipper boots)
Note
The Robin_nano35.bin is only for using on SD card with motherboard stock bootloader.
-
Optional for load cell support: Build lower function adapter board MCU firmware
sudo service klipper stop
cd ~
cd klipper
make clean
cp ~/load_cell.menu.config .config
make menuconfig
make
cp out/klipper.elf ~/load_cell.elf
cp out/klipper.bin ~/load_cell.bin
cp .config  ~/load_cell.menu.config
sudo service klipper start
Note
Load Cell MCU menuconfig settings:
-
Enable extra low-level configuration options
-
Micro-controller Arch (STM32)
-
Processor model (STM32F103)
-
Bootloader offset (8KiB Bootloader)
-
Clock Reference (8 MHz)
-
Communication interface (Serial (on USART1 PA10/PA9))
-
(250000) Baud for serial port
- Build Katapul bootloaders
sudo service klipper stop
cd ~
cd katapult
make menuconfig
make clean
make
cp out/katapult.elf ~/mb_katapult.elf
cp out/katapult.bin ~/mb_katapult.bin
sudo service klipper start
Note
- Micro-controller Arch (STM32)
- Processor model (STM32F103)
- Deployment app (Do not build)
- Clock Reference (8 MHz)
- Communication interface (Serial (on USART3 PB11/PB10))
- Application start offset (8KiB bootloader)
- (250000) Baud for serial port
- (!PD12) Status LED: Optional will turn on led by SD card but will direct short if an SD card is inserted!!!
sudo service klipper stop
cd ~
cd katapult
make menuconfig
make clean
make
cp out/katapult.elf ~/lc_katapult.elf
cp out/katapult.bin ~/lc_katapult.bin
sudo service klipper start
Note
- Micro-controller Arch (STM32)
- Processor model (STM32F103)
- Deployment app (Do not build)
- Clock Reference (8 MHz)
- Communication interface (Serial (on USART1 PA10/PA9))
- Application start offset (8KiB bootloader)
- (250000) Baud for serial port
-
Make custom cables
-
Print custom brackets
-
Install pi in custom bracket (four M2.5x6 screws)
-
Install screen in custom bracket
-
Remove the stock screen, host (core board) PCB, ribbon cable on lower adapter board, power cable from lower adapter board, cable from the usb hub
-
Optional for load cell support:
-
Remove the J20 5 pin header pins and replace with right angle head pins on bottom of pcb if room
-
A magnet/enamel wire needs added to jumper Pin 30 on STM32F103 to Pin 32
-
-
Install the PI, slide over existing standoffs, secure with two M3x6 screws
-
Connect usb adapter extension from pi to the usb cable running to upper adapter board / motherboard
-
Connect custom usb hub cable to pi usb and gpio
-
(Optional) Connect ethernet cable and fit the bulkhead adapter somewhere.
-
Connect the custom power cable from lower adapter board to GPIO
-
Initial test, at this point pi and screen should boot when printer turned on. Klipperscreen should load and show MCU Protocol Error. The MCU firmware needs to be updated (or potentially Klipper downgraded) to be be compatible.
Warning
After flashing the Klipper MCU firmware returning printer to original stock configuration is not possible!
-
Flash motherboard MCU
- Copy the ~/klipper/out/Robin_nano35.bin file to an empty fat32 formatted sd card
- With printer powered off, install the sd card in the motherboard
- Power on printer and wait 30 seconds
- Power off printer and remove the sd card
- Robin_nano35.bin should be renamed to Robin_nano35.cur
-
Optional for [load_cell] support: Use ST-Link v2 programmer or similar to flash the load_cell.bin firmware to the STM32
- Configure openocd, stlink tools, or similar for your programming adapter and OS
- Connect STLINK v2 adapter to JTAG port on lower function adapter board
- Save a copy of the existing firmware
st-flash read out.bin 0x0800000 0x20000 - Write the load_cell.bin file to the MCU
st-flash write load_cell.bin 0x08000000
sudo service klipper stop
python3 ~/katapult/scripts/flashtool.py --request-bootloader -d /dev/serial/by-id/usb-1a86_USB_Serial-if00-port0
python3 ~/katapult/scripts/flashtool.py -d /dev/serial/by-id/usb-1a86_USB_Serial-if00-port0 -f ~/motherboard.bin
sudo service klipper start

sudo service klipper stop
python3 ~/katapult/scripts/flashtool.py --request-bootloader -d /dev/ttyS0
python3 ~/katapult/scripts/flashtool.py -d /dev/ttyS0 -f ~/load_cell.bin
sudo service klipper start


st-flash erase
st-flash write mb_katapult.bin 0x08000000
st-flash write motherboard.bin 0x08002000


st-flash erase
st-flash write lc_katapult.bin 0x08000000
st-flash write load_cell.bin 0x08002000

host MCU update
sudo service klipper stop
make flash
sudo service klipper start