You can program ESPino with the Arduino IDE for ESP8266 or with LUA, with the node-mcu firmware.
-
Mac OSX:
- Go to the
Driversfolder and openSiLabsUSBDriverDisk.dmg - Execute
Silicon Labs VCP Driver.pkgand follow the instructions
- Go to the
-
Windows:
- Go to the
Driversfolder and unzipCP210x_VCP_Windows.zip - Execute the firmware corresponding to your system (x86 or x64).
- Go to the
-
Linux:
It should be automatically detected and mounted on
/dev/ttyUSB0or similar.
You can find installation instructions and documentation here: https://github.com/esp8266/Arduino
Step by step videotutorial with ESPino (in spanish): https://youtu.be/HYZPlrH3jCE
- Upload the node-mcu firmware to ESPino, instructions are at the end of this document
- Make sure you have Java installed in your PC (https://www.java.com/en/download/)
- Launch it making double click on ESPlorer.jar, or on Windows, ESPlorer.bat
- Select the correct serial port, 9600 bauds and click open
- An error saying that the expected response was not received could appear, this is normal
- You can open one of the examles in the
examplesfolder, and execute it with "Send to ESP" (it is not permanently saved to the ESP, it will be lost if it's restarted) - You can save it in the ESP with "Save to ESP". If you want it to be executed as the ESP starts, you should save it with the name
init.lua - You can see node-mcu's documentation here: https://github.com/nodemcu/nodemcu-firmware/wiki/nodemcu_api_en
You can find the Datasheet, schematic and other info of ESPino in the "Docs" folder included with this file.
For programming the ESPino in lua, you need to upload the node-mcu firmware, for that do the following:
- Connect the ESPino to the PC via an micro-USB cable, make sure you have already installed the driver
- Launch "ESP8266Flasher.exe"
- Select the COM port corresponding to ESPino

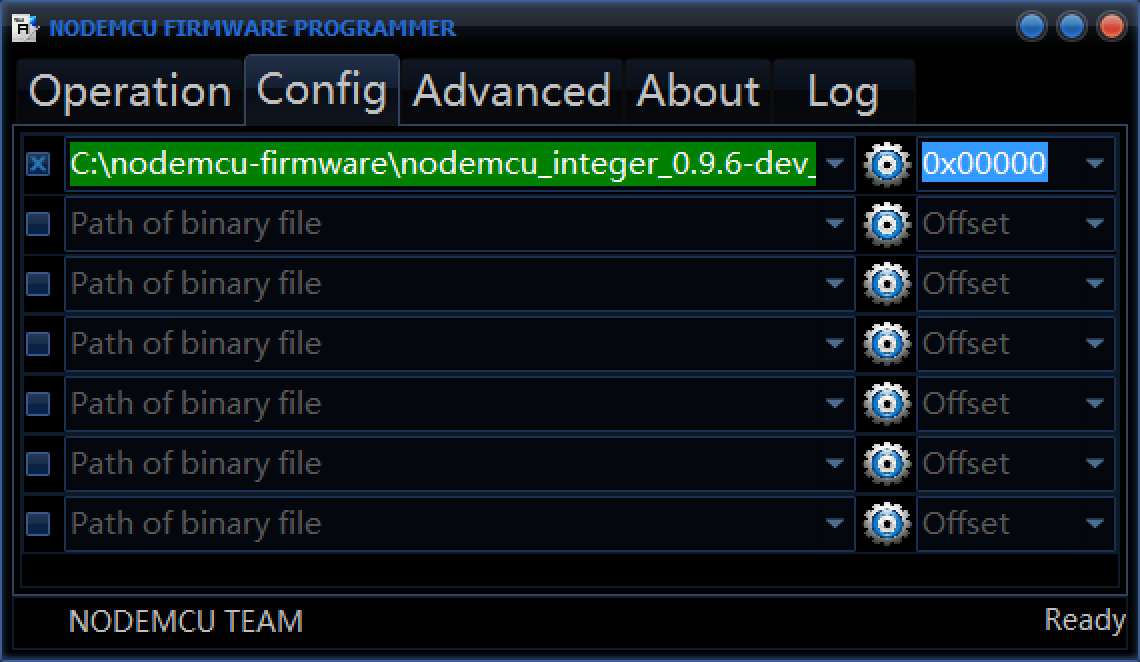
- In the "Config" tab, press the gear icon in the first element and select the firmware file. In the "nodemcu-firmware" folder you can find two versions, with or without floating point support.
- Put the ESPino in Bootloader mode:
I. Press the RESET and USER/PROG buttons at the same time without releasing them
II. Release the RESET button, keeping USER/PROG pressed
III. Wait a second and release USER/PROG
- Click "Flash" for uplading the firmware
- When it's finished, press the RESET button
Open a terminal and go to the folder where this file lies:
cd [path to this folder]
Connect the ESPino via USB and put it in Bootloader mode:
- Press the RESET and USER/PROG buttons at the same time without releasing them
- Release the RESET button, keeping USER/PROG pressed
- Wait a second and release USER/PROG
Install the serialport deoendency for esptool, execute:
sudo easy_install -U pyserial
Execute the following for uploading the firmware:
esptool/esptool.py -p /dev/tty.SLAB_USBtoUART write_flash 0x000000 nodemcu-firmware/pre_build/latest/nodemcu_latest.bin
Note: You may need to change the serial port path /dev/tty.SLAB_USBtoUART in the previous command line depending on your system.