QMK
This article is about nrf52 QMK branch, the most mature wireless software up to date.
- There's an article about alternative firmware by jpconstantineau, it's much simpler than QMK (recommended!): Bluemicro
- There's also an article about the new Zephyr-based ZMK firmware, it's work in progress but it's already functional: ZMK
- Articles about QMK-based keyboards moved here: http://github.com/joric/qmk/wiki (Jorne BLE gets latest updates)
- Also read about my take on open-sourcing the BLE-Micro-Pro "Default Firmware" bootloader: BMPAPI (doesn't work yet)
- Also check out Circuitpython article, it's a new hip thing that already kind of works (needs more people!)
If you got your nRFMicro without a preinstalled bootloader, read the Bootloader article first.
The nRF5x-compatible nrf52 QMK fork is maintaned by sekigon-gonnoc. My copy is always a little bit outdated, so please base all your keyboards off his repository. You will also need my custom_board.h for the nRFMicro pin definitions. Note that nrf52 fork will never be officially merged into QMK, because QMK apparently сonflicts with the Nordic licensing terms.
Issue tracker: https://github.com/sekigon-gonnoc/qmk_firmware/issues
- https://github.com/sekigon-gonnoc/qmk_firmware/tree/nrf52 (original fork by sekigon)
- https://github.com/joric/qmk/tree/nrf52-jorne (my fork, RGB sync and EEPROM, see jorne_ble)
See other repositories in the Alternative firmware section.
This section is about sekigon's QMK fork.
To flash the keyboard firmware using a standard .uf2 bootloader you have to convert standard .hex to the UF2 format, using uf2conv.py:
uf2conv.py firmware.hex -c -f 0xADA52840
Press reset button twice within 500ms interval to boot to the UF2 bootloader.
Then just copy the resulting flash.uf2 file to the UF2 USB drive (split keyboards require either master or slave firmware file accordingly). The module will automatically reboot after firmware update.
You can get example precompiled firmware here:
You will need nRF52 SDK (namely nRF5_SDK_15.0.0_a53641a) to build the firmware:
WSL1 is 10+ times faster than WSL2 if you work with NTFS partition. You will need following packages:
sudo apt-get install make gcc unzip wget zip gcc-avr binutils-avr avr-libc dfu-programmer dfu-util gcc-arm-none-eabi binutils-arm-none-eabi libnewlib-arm-none-eabi
You can build nrf52 QMK fork as so (paths are WSL-compatible):
make git-submodule
export NRFSDK15_ROOT=/mnt/c/SDK/nRF5_SDK_15.0.0_a53641a
make ergo42_ble/master
make ergo42_ble/slave
You might need to patch the makefile tmk_core/nrf.mk beforehand if you're using WSL.
- error: 'for' loop initial declarations are only allowed in C99 or C11 mode:
-CC = arm-none-eabi-gcc
+CC = arm-none-eabi-gcc -std=c99- get rid of wchar_t size warnings:
#  LDFLAGS += -L. $(NRFLIB)
+ LDFLAGS += -Wl,--no-wchar-size-warning
Also make sure that arm-gcc --version is at least 5.4.0 (I'm using WSL on Windows 10 with Ubuntu 18.04).
You have to flash Master and Slave firmwares separately, there's no unified firmware for both halves.
See example firmware and all the hardware keyboard shortcuts here: https://github.com/joric/qmk/wiki/jorne_ble
TL;DR install msys2, read (or run) qmk/util/msys2_install.sh for dependencies.
Couldn't make it work but you could start from here:
- https://distortos.org/documentation/arm-toolchain-windows/
- https://launchpad.net/gcc-arm-embedded/
- https://github.com/gnu-mcu-eclipse/windows-build-tools/releases
The easiest way is to install nRF52 boards from Arduino IDE and add toolchain to the path. "Bleeding edge" ARM toolchain also looks promising, but needs rebuilding.
- MacOS Mojave 10.14.4
- MacBook Pro (Retina, 13-inch, Late 2012)
- nRF52-DK (PCA10040)
- Install GCC
brew tap PX4/homebrew-px4
brew update
brew install gcc-arm-none-eabi
- Download and unzip inside
~/Development/nRF52/
-
nRF5-SDK 15.3.0 in
SDK_15.3.0folder -
nRF5 Command Line Tools 9.8.1 in
CLT_9.8.1folder
- Symlink command line tools
ln -s ~/Development/nRF52/CLT_9.8.1/nrfjprog/nrfjprog /usr/local/bin/nrfjprog
ln -s ~/Development/nRF52/CLT_9.8.1/mergehex/mergehex /usr/local/bin/mergehex
- Change the nRF SDK to use my version of arm-gcc changing the file
~/Development/nRF52/SDK_15.3.0/components/toolchain/gcc/Makefile.posixto reflect the location of my homebrew installed version
GNU_INSTALL_ROOT := /usr/local/Cellar/gcc-arm-none-eabi/20180627/bin
GNU_VERSION := 7.3.1
GNU_PREFIX := arm-none-eabi
cd ~/Development/nRF52/SDK_15.3.0/examples/peripheral/blinky/pca10040/blank/armgcc
make
make flash
A concise version of Aaron Eiche's Programming an nRF52 on a Mac
(Mac OS guide taken from here.)
Every nrf52 keyboard automatically creates two virtual interfaces on a single USB port - USB HID and USB Serial for debugging. Use terminal at 115200 baud to debug. You can debug both Master and Slave using two USB cables and two ports.
All the nrf info messages are also redirected there. It's also bidirectional so it's a whole debug console. I'm using Putty serial at 115200 baud, you can try something like screen /dev/ttyACM0 115200 on Linux.
Example output (send "dfu" to reboot into bootloader, send "help" for help):
<info> app: Erase all bonds!
<info> app: Fast advertising.
<info> app: Slave keyboard is disconnected
<info> app: Scanning slave keyboard...
<info> app: Connected to the slave keyboard
Example debug string:
NRF_LOG_INFO("process_record_user, keycode: %d\n", keycode);Stock QMK nrf52 is pretty laggy. Use these settings from let's split BLE config.h to make it better.
#define BLE_NUS_MIN_INTERVAL 30 // default 60
#define BLE_NUS_MAX_INTERVAL 60 // default 75
#define BLE_HID_MAX_INTERVAL 80 // default 90
#define BLE_HID_SLAVE_LATENCY 10 // default 4
It's all usually the smaller the faster, and bigger values save the battery life (e.g. use smaller BLE_HID_SLAVE_LATENCY if master-slave link lags). More info here https://github.com/sekigon-gonnoc/BLE-Micro-Pro (in Japanese). Also this guy talks about lags on QMK nrf52 (in Japanese): https://log.brdr.jp/post/395. Also follow this reddit thread: https://redd.it/brcxha.
How the RGB sync feature works basically: master is NUS (Nordic UART Service) central, slave is peripheral, the connection is bidirectional so along with receiving keystrokes from slave master also can send RGB sync packet to slave using ble_nus_c_string_send and slave can receive that data with ble_nus_recv_bytes. There's no much traffic, it doesn't affect the battery, it sends RGB config once when you change the mode. Related links (the commit adds reverse communication from master to slave and RGB sync, the eeprom file adds eeprom support because sekigon just used a stub):
- https://github.com/sekigon-gonnoc/qmk_firmware/issues/28 (enabling LEDs from battery)
- https://github.com/joric/qmk/commit/b6363608f97c91fdfb4b28cb1c48832b1bb8e9b2 (rgb sync commit)
- https://github.com/joric/qmk/blob/nrf52-jorne/tmk_core/common/nrf/eeprom.c (eeprom)
- https://youtu.be/db0lufQQNZY (video)
Power mosfet (pin 1.09, since version 1.0) disconnects external GND to improve battery life for power hungry switchboards such as HHKB and SK6812 RGB LEDs (each LED consumes ~1mA of current when OFF). Keyboard matrix still works no matter what, because matrix connects to GND internally via MCU. Note that in 1.3 you have to init this pin because mosfet gate is not pulled up. Usage:
#define POWER_PIN GPIO(1,9)
...
nrf_gpio_cfg_output(POWER_PIN);
...
nrf_gpio_pin_clear(POWER_PIN); // set power on
...
nrf_gpio_pin_set(POWER_PIN); // set power off
Note that all the newer versions use logical 1 to turn the power off (1.1 worked in reverse). MCU retains GPIO state so is fine.
Versions 1.2+ can control charger PROG pin (it's connected via 10K resistor), it can be used for setting charger modes:
#define PROG_PIN GPIO(0,5)
...
nrf_gpio_cfg_output(PROG_PIN); nrf_gpio_pin_clear(PROG_PIN); // PROG to GND via 10K, ~100 mA (80+ mAh batteries)
...
nrf_gpio_cfg_input(PROG_PIN, NRF_GPIO_PIN_NOPULL); // PROG to float/high-z (non-chargeable batteries)
...
nrf_gpio_cfg_input(PROG_PIN, NRF_GPIO_PIN_PULLDONW); // PROG to GND via 10K+13K, ~43 mA (45+ mAh LIR2032 batteries)
Don't disable the charger if the battery is full, charger IC has a built in control for that. Status pin (STAT) is not available in nRFMicro 1.3 revisions (there's no red LED also) but you can check the battery voltage from the battery pin.
Note that In 1.3 you absolutely have to init and set the PROG_PIN properly.
Pin 0.26 (revisions up to 1.1) is connected to the battery switch via 10K resistor and detects whether the battery switch (SW1) is ON or OFF in wired mode. The switch disconnects the battery from the BT module, but not from the Li-Po charger. Used as wireless/wired mode flag in Jian BLE while USB is plugged in:
#define SWITCH_PIN GPIO(0,26)
...
nrf_gpio_cfg_input(SWITCH_PIN, NRF_GPIO_PIN_PULLDOWN);
...
if (nrf_gpio_pin_read(SWITCH_PIN)) {
    // battery switch is ON
} else {
    // battery switch is OFF
}
Switch pin is obsolete in 1.2+ version because there's no physical on/off switch on board anymore.
I was under impression 0.26 could be configured as an analog pin but it only detects two logic levels. After bridging 0.26 to analog pin (currently 0.04/AIN2) it's possible to read the actual voltage. If you use 10K resistor and the internal pull-down of 13kOhms, you get a useable range of 2.37V (at 4.2V) to 1.36 (at 2.4V). Newer revisions use fixed 820K/2M divider. Code in question (adc.c):
void adc_start() {
#ifdef USE_BATTERY_PIN
  nrf_saadc_channel_config_t pincfg = NRF_DRV_SAADC_DEFAULT_CHANNEL_CONFIG_SE(NRF_SAADC_INPUT_AIN2); // pin 0.04
#else
  nrf_saadc_channel_config_t pincfg = NRF_DRV_SAADC_DEFAULT_CHANNEL_CONFIG_SE(NRF_SAADC_INPUT_VDD);
#endif
  nrf_drv_saadc_channel_init(0, &pincfg);
  nrf_drv_saadc_buffer_convert(adc_buffer, 1);
  nrf_drv_saadc_sample();
}

uint16_t get_vcc() {
#ifdef USE_BATTERY_PIN
  return ((uint32_t)adc_buffer[0]*6*600/255) * (BATTERY_R1 + BATTERY_R2) / BATTERY_R2;
#else
  return ((uint32_t)adc_buffer[0]*6*600/255);
#endif
}One could experience problems with Bluetooth pairing between the halves or to the computer.
Hardware shortcut that resets bonds on the slave keyboard could be hard to find. Check out the code, it's usually first 3 keys on the row0 (hold while powering on).
Note that in the old version to reconnect master to the computer you had to restart advertising without whitelist yet again, it did not connect automatically (new define ENABLE_STARTUP_ADV_NOLIST fixes that issue). You also need to reset the bonds beforehand (it's easier on master, usually defined in the keymap).
- https://github.com/jpconstantineau/BlueMicro_BLE (BlueMicro firmware)
- https://github.com/joric/bmpapi (Open-source version of the BLE-Micro-Pro "Default Firmware" bootloader)
- https://docs.nicekeyboards.com (Nice!nano documentation)
- https://github.com/Lenbok/qmk_firmware/ (integration, staging and features by Lenbok)
- https://github.com/chie4hao/qmk_firmware_nrf52840 (I took eeprom.c from here)
- https://github.com/jiaxin96/qmk/ (feature branches, e.g. nrf52-jiaxin-r2c)
- https://github.com/luantty2/qmk (includes EEPROM support, maybe more, haven't really checked)
- https://github.com/luantty2/nRF52840-instruction (some documentation and encoder support, in Chinese)
- https://github.com/tsiank/dev_qmk_nrf52840_ciank (something QMK, also see other repositories)
- https://github.com/Lotlab/nrf52-keyboard (TMK-based nRF52840 firmware)
- https://github.com/mrzealot/absolem-firmware (mrzealot's Absolem Firmware for nRF52 and Arduino IDE)
- https://github.com/zmkfirmware/zmk (Zephyr-based Mechanical Keyboard Firmware)
- https://www.zephyrproject.org (GPL2+ licensed Bluetooth platform, but it's not a library)
- https://github.com/apache/mynewt-nimble (NimBLE - open source SoftDevice for Nordic, same license as ChibiOS) looks promising for merging into QMK upstream. Sadly up to date NimBLE lacks any keyboard-related samples or even reference HID implementation.
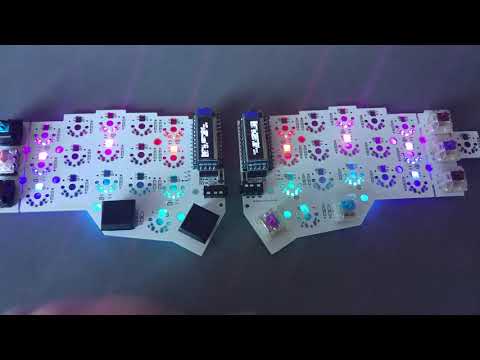
nRFMicro 1.1 vs QMK nrf52 - RGB Sync
- https://github.com/AndruPol/nrf52832-recover/issues/1 (nRF52 unlocking)
- https://github.com/blacksphere/blackmagic/issues/230 (unlocking with BMP)
- https://github.com/adafruit/Adafruit_nRF52_Bootloader (Adafruit bootloader)
- https://github.com/sekigon-gonnoc/qmk_firmware/tree/nrf52 (nRF5x QMK platform)
- https://github.com/joric/qmk_firmware/tree/nrf52 (my fork, working on it!)
- https://developer.nordicsemi.com/nRF5_SDK/nRF5_SDK_v15.x.x/
- https://github.com/jpconstantineau/BlueMicro_BLE (NRF52-Board firmware)
- https://github.com/joric/qmk/wiki (my nRF52 firmware for different keyboards)