Description
Name: Vaibhav E
Email: [email protected]
Linkedin Profile: https://www.linkedin.com/in/vaibhav231093
Step 1 : Set up the server
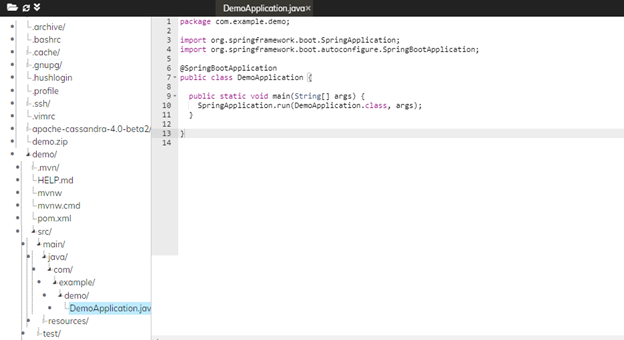
Step 1a : unzip demo.zip and open DemoApplication.java
Step 1b : Run the project in the terminal with the following command.
cd /root/demo
mvn spring-boot:run

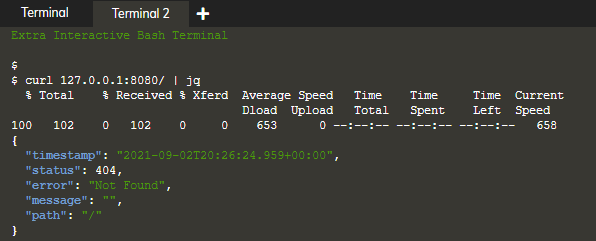
Step 1c : Run the below command in the second terminal
curl 127.0.0.1:8080/ | jq
Expected Output :
Step 2 : Add a simple response
Step 2a : Modify DemoApplication.java by adding request mapping method, changing class annotations and fix up the imports like below.
Open demo/src/main/java/com/example/demo/DemoApplication.java
`package com.example.demo;
import org.springframework.boot.SpringApplication;
import org.springframework.boot.autoconfigure.;
import org.springframework.web.bind.annotation.;
@RestController
@EnableAutoConfiguration
public class DemoApplication {
public static void main(String[] args) {
SpringApplication.run(DemoApplication.class, args);
}
@RequestMapping("/")
String home() {
return "Home\n";
}
// TODO: add Hello handler here
}`

Step 2b : Run the below command in the terminal 1
# Sending a Ctrl-C to stop the server

Step 2c : Run the below command to start the server
mvn spring-boot:run

Step 2d : Run the below command to see the expected output (i.e, Home)
curl 127.0.0.1:8080/
Expected Output :

Step 3 : Create a parameterized response
Step 3a : Modify DemoApplication.java to add a response for the /hello endpoint
Open demo/src/main/java/com/example/demo/DemoApplication.java
@RequestMapping("/hello") String hello() { return "Hello World\n"; }

Step 3 b : Run the below command to restart the terminal 1
# Sending a Ctrl-C and restarting the server
mvn spring-boot:run

Step 3c : Run the below command to see the hello endpoint output
curl 127.0.0.1:8080/hello
Expected Output :

Step 3d : We can customize the end point by adding a parameter. We'll pass the parameter into our handler method using the @RequestParam annotation, which also allows us to set a default value.
`package com.example.demo;
import org.springframework.boot.SpringApplication;
import org.springframework.boot.autoconfigure.;
import org.springframework.web.bind.annotation.;
@RestController
@EnableAutoConfiguration
public class DemoApplication {
public static void main(String[] args) {
SpringApplication.run(DemoApplication.class, args);
}
@RequestMapping("/hello")
String hello(@RequestParam(value = "name", defaultValue = "World") String name) {
return String.format("Hello %s!\n", name);
}
@RequestMapping("/")
String home() {
return "Home\n";
}
}
`
Step 3e : Back in terminal 1, restart the server.
# Sending a Ctrl-C and restarting the server mvn spring-boot:run
Step 3f : In terminal 2, first try the endpoint with no parameter to see the default behavior (Hello World!). Run the below command
curl 127.0.0.1:8080/hello
Expected Output:

Step 3g: Now, try it with a parameter to see a greeting for Alex (Hello Alex!).
curl 127.0.0.1:8080/hello?name=Alex
Expected Output:

Step 4 : Access Cassandra from Java
Step 4a :
To put things in context, let's see how we can access a Cassandra cluster using the Java driver.
Let's start by creating a user_credentials table. We've already installed and started Cassandra for you, so just execute the following to create the keyspace and table.
export PATH="/root/apache-cassandra-4.0-beta2/bin:$PATH" cqlsh -e " CREATE KEYSPACE user_management WITH REPLICATION = { 'class' : 'SimpleStrategy', 'replication_factor' : 1 }; CREATE TABLE user_management.user_credentials( username text, password text, PRIMARY KEY(username));"

Step 4b : We can add a handful of records to the table.
cqlsh -e " INSERT INTO user_management.user_credentials (username, password) VALUES ('User1', 'YouWontGuessThis'); INSERT INTO user_management.user_credentials (username, password) VALUES ('User2', 'SuperSecret'); INSERT INTO user_management.user_credentials (username, password) VALUES ('User3', 'UncrackablePassword');"

Step 4c : Next, let's create a Java program to access the table. We'll start by setting up a Maven project
mvn archetype:generate -DgroupId=com.datastax -DartifactId=driver-example -Dversion=1.0-SNAPSHOT -DinteractiveMode=false
Step 4d : Open App.java
Open driver-example/src/main/java/com/datastax/App.java

Step 4e : Maven projects use a pom.xml file to keep track of dependencies, etc. Inspect the pom.xml for this project
Open driver-example/pom.xml
<properties> <maven.compiler.target>1.8</maven.compiler.target> <maven.compiler.source>1.8</maven.compiler.source> </properties> <dependencies>

Step 4f : We need to modify pom.xml to include the Java driver.
Open driver-example/pom.xml
<dependency> <groupId>com.datastax.oss</groupId> <artifactId>java-driver-core</artifactId> <version>4.8.0</version> </dependency> <dependency> <groupId>org.slf4j</groupId> <artifactId>slf4j-api</artifactId> <version>1.7.5</version> </dependency> <dependency> <groupId>org.slf4j</groupId> <artifactId>slf4j-simple</artifactId> <version>1.6.4</version> </dependency> </dependencies>

Step 4g : Let's run the program just to make sure everything is set up correctly.
cd /root/driver-example mvn compile exec:java -Dexec.mainClass=com.datastax.App 2> /dev/null

Step 4h : Let's go back to the Java program. We'll modify the Java program to query the cluster. Here's the code.
Open driver-example/src/main/java/com/datastax/App.java
`package com.datastax;
import com.datastax.oss.driver.api.core.CqlSession;
import com.datastax.oss.driver.api.core.cql.*;
/**
- Hello world!
*/
public class App
{
public static void main( String[] args )
{
System.out.println( "Starting a query!" );
try (CqlSession session = CqlSession.builder().build()) {
ResultSet rs = session.execute("select * from user_management.user_credentials");
for (Row row: rs) {
System.out.println("username = "+row.getString("username") + ", password = " + row.getString("password"));
}
}
}
}`

We see that this query code sets up a CqlSession, and then uses the session to execute a CQL query to retrieve all users.
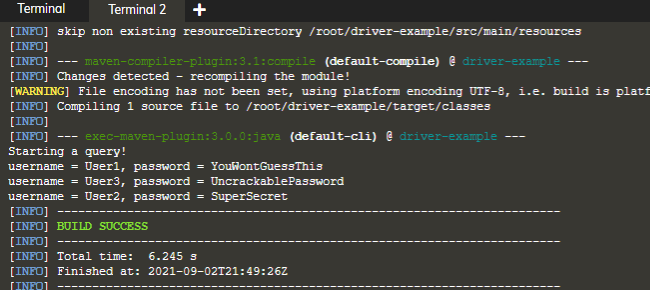
Step 4i : Run this query program in the terminal
mvn compile exec:java -Dexec.mainClass=com.datastax.App 2> /dev/null cd /root
Expected Output :
Step 5 : Create a simple REST service
Step 5a : Open DemoApplication.java . We'll create a /users endpoint and query our Cassandra table for the response. Then, we'll convert the response to JSON and return it to create a simple REST service.
`package com.example.demo;
import org.springframework.boot.SpringApplication;
import org.springframework.boot.autoconfigure.;
import org.springframework.web.bind.annotation.;
import com.datastax.oss.driver.api.core.CqlSession;
import com.datastax.oss.driver.api.core.cql.*;
import com.google.gson.Gson;
import java.util.*;
@RestController
@EnableAutoConfiguration
public class DemoApplication {
@RequestMapping("/hello")
String hello(@RequestParam(value = "name", defaultValue = "World") String name) {
return String.format("Hello %s!\n", name);
}
@RequestMapping("/users")
String users() {
ArrayList<HashMap<String, String>> results = new ArrayList<HashMap<String, String>>();
String result = "";
try (CqlSession session = CqlSession.builder().build()) {
ResultSet rs = session.execute("select * from user_management.user_credentials");
result = "[";
for (Row row: rs) {
HashMap<String, String> record = new HashMap<String, String>();
record.put("username", row.getString("username"));
record.put("password", row.getString("password"));
results.add(record);
}
}
Gson g = new Gson();
return g.toJson(results);
}
@RequestMapping("/")
String home() {
return "Home\n";
}
public static void main(String[] args) {
SpringApplication.run(DemoApplication.class, args);
}
}`
Step 5b : We need to add some dependencies to pom.xml for the Cassandra Java driver and for Gson (Gson is a utility that converts Java objects to JSON).
Open demo/pom.xml
The dependencies include the Cassandra driver, some logging utilities and Gson.
<dependency> <groupId>com.datastax.oss</groupId> <artifactId>java-driver-core</artifactId> </dependency> <dependency> <groupId>org.slf4j</groupId> <artifactId>slf4j-api</artifactId> <version>1.7.5</version> </dependency> <dependency> <groupId>org.slf4j</groupId> <artifactId>slf4j-simple</artifactId> <version>1.6.4</version> </dependency> <dependency> <groupId>com.google.code.gson</groupId> <artifactId>gson</artifactId> </dependency> </dependencies>

Step 5c : Restart the server and wait for it to initialize.
# Sending a Ctrl-C and restarting the server mvn spring-boot:run
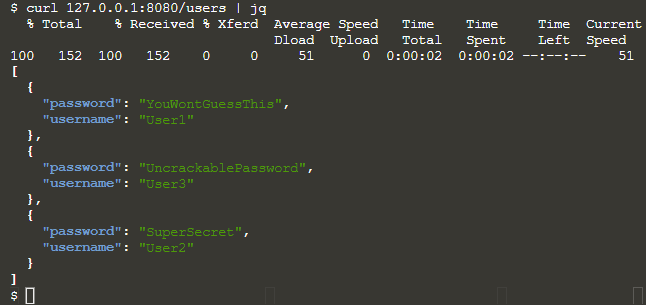
Step 5d : Finally, let's test the simple REST endpoint that retrieves all users. Run the below command in the terminal
curl 127.0.0.1:8080/users | jq
Expected Output :

Step 6 : Add a parameter to the simple REST service
Step 6a : Finally, let's modify the /users endpoint to retrieve a specific user.
Open demo/src/main/java/com/example/demo/DemoApplication.java
We'll add a @RequestParam annotation to our endpoint as shown in this code. We will also modify the query. If the name parameter is present, we add a WHERE clause with the name.
`package com.example.demo;
import org.springframework.boot.SpringApplication;
import org.springframework.boot.autoconfigure.;
import org.springframework.web.bind.annotation.;
import com.datastax.oss.driver.api.core.CqlSession;
import com.datastax.oss.driver.api.core.cql.*;
import com.google.gson.Gson;
import java.util.*;
@RestController
@EnableAutoConfiguration
public class DemoApplication {
@RequestMapping("/hello")
String hello(@RequestParam(value = "name", defaultValue = "World") String name) {
return String.format("Hello %s!\n", name);
}
@RequestMapping("/users")
String users(@RequestParam(value = "name", defaultValue = "") String name) {
ArrayList<HashMap<String, String>> results = new ArrayList<HashMap<String, String>>();
String result = "";
try (CqlSession session = CqlSession.builder().build()) {
String query = "select * from user_management.user_credentials";
if (name.length() > 0) {
query += " where username = '" + name + "'";
}
ResultSet rs = session.execute(query);
result = "[";
for (Row row: rs) {
HashMap<String, String> record = new HashMap<String, String>();
record.put("username", row.getString("username"));
record.put("password", row.getString("password"));
results.add(record);
}
}
Gson g = new Gson();
return g.toJson(results);
}
@RequestMapping("/")
String home() {
return "Home\n";
}
public static void main(String[] args) {
SpringApplication.run(DemoApplication.class, args);
}
}`
Step 6b : Restart the server and wait for it to initialize.
# Sending a Ctrl-C and restarting the server mvn spring-boot:run
Step 6c : We can try the default behavior for the /users endpoint to retrieve all users.
curl 127.0.0.1:8080/users | jq
Expected Output :
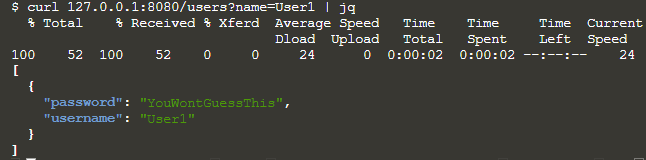
Step 6d: let's test the endpoint with a parameter to retrieve a single user.
curl 127.0.0.1:8080/users?name=User1 | jq
Expected Output :