Happy to introduce SSH VPN integration for NetworkManager. The SSH VPN can be used just anywhere!
Basically NetworkManager-ssh integrates OpenSSH tunnel capabilities with NetworkManager and provides you with the easiest of all VPNs, as OpenSSH lives on almost any *nix machine today.
If you're using Fedora 41 or later, you can simply run:
# dnf install NetworkManager-ssh-gnomeIf you're using Fedora 41 or later, with KDE Plasma 5 run:
# dnf install NetworkManager-ssh plasma-nm-sshThat will set you up with NetworkManager and the traditional GNOME interface. I am the current maintainer of the package for Fedora.
On older versions of Fedora or CentOS, you can run the following after cloning the repository:
$ autoreconf -fvi && ./configure && make rpmEnjoy your new RPM.
On recent Debian/Ubuntu distributions you should be able to install with:
# apt-get install network-manager-sshIn case you want to build the package for Debian/Ubuntu, you can use the complimentary packaging this repository provides. But please do not open bugs about it on this GitHub issue tracker. The correct thing to do is to use the upstream packages provided with the distribution and open bugs on the distribution issue tracker.
Building a .deb should be straight forward with:
# apt-get install libnm-glib-dev libnm-glib-vpn-dev libnm-util-dev libnm-dev libnma-dev libgnome-keyring-dev dh-autoreconf libgtk-3-dev sshpass
$ autoreconf -fvi && ./configure && make deb
Enjoy your new .deb. (It should show up in the directory you git cloned from.)
On old distributions with NetworkManager < 0.9.10, such as Ubuntu 14.04, use the 0.9.3 tag:
$ git checkout 0.9.3
$ autoreconf -fvi && ./configure && make debA package for Arch is available in the AUR - https://aur.archlinux.org/packages/networkmanager-ssh
Please edit /etc/dbus-1/system.d/org.freedesktop.NetworkManager.conf and add the line:
<allow send_destination="org.freedesktop.NetworkManager.ssh"/>Make sure your target host is known in ~/.ssh/known_hosts.
If it's not there, you should add it manually or by SSHing to it:
$ ssh root@TARGET_HOST
The authenticity of host 'TARGET_HOST' can't be established.
ECDSA key fingerprint is SHA256:XXXXXXXXXXXXXXXXXXXXXXXXXXXXXXXXXXXXXXXXXXX.
ECDSA key fingerprint is MD5:XX:XX:XX:XX:XX:XX:XX:XX:XX:XX:XX:XX:XX:XX:XX:XX.
Are you sure you want to continue connecting (yes/no)? yes
Warning: Permanently added 'TARGET_HOST' (ECDSA) to the list of known hosts.
If all went right, you should have a new VPN of type SSH when creating a new VPN.
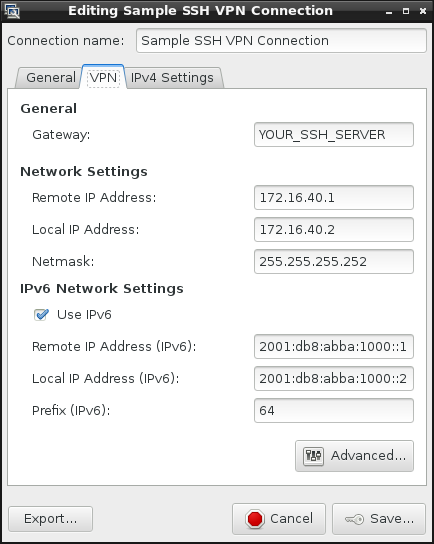
For that scenario, remote root login is required, and you want to achieve a full tap/tun tunnel. Use the following settings:
- Define IP addresses on the same subnet for both local and remote ends
- The default are 172.16.40.1/255.255.255.252 for the remote end, and 172.16.40.2/255.255.255.252 locally
- Leave all settings as default, but adjust remote host and port
For authentication, it is generally recommended to use key based authentication, either ssh-agent or a static key.
It is possible to login with a non-privileged user on the remote end, but still have a tun/tap device opened, with some prior preparation.
Prepare the tun100 device on the remote host to be used by a non-privileged user:
# ip tuntap add name tun100 mode tun user dan
In the advanced dialog set the following:
- Set the remote user to login with - that has permissions for the tun/tap device (
danin the example above) - Set the device number to match the device you've pre-opened on the remote host (
100in that case) - Decide how you want the IP address to be set on the other side
- Use
sudofor the remote commands, and NetworkManager-ssh will handle that - Tick
Disable remote command (-N), and set the IP address manually on the remote end- Something along the lines of:
/sbin/ip addr add 172.16.40.1/255.255.255.252 peer 172.16.40.2/255.255.255.252 dev tun100
- Something along the lines of:
- Use
If you are after a no full tunnel support, tick both in the advanced dialog:
No tunnel(this also implies-N, for no remote command)- You can choose a non-privileged user on the remote host as well
This mode is handy if you're after setting a SSH connection with one or more of the following options:
- SOCKS proxy (
-D) - Local port binding (
-L) - Remote port binding (
-R)
Each of the above option take multiple arguments that are space separated.
NetworkManager requires a device for the VPN to be bound to, so a dummy device is being used with dummy IP addresses.
When things go wrong and you can't really figure out what's happening, have a look at /var/log/messages as you spin up the connection.
You should be able to tell what is going wrong.
Even though this is a bit off-topic, I've decided to cover it anyway.
On the server, you'll need to enable in /etc/ssh/sshd_config:
PermitTunnel=yes
Enable kernel packet forwarding:
# echo 1 > /proc/sys/net/ipv4/ip_forwardIn terms of firewall configuration, I recommend looking at the "standard" way of editing firewall rules on your distribution. These however, should work on most GNU/Linux distributions.
Tun devices:
# iptables -I FORWARD -i tun+ -j ACCEPT
# iptables -I FORWARD -o tun+ -j ACCEPT
# iptables -I INPUT -i tun+ -j ACCEPT
# iptables -t nat -I POSTROUTING -o EXTERNAL_INTERFACE -j MASQUERADE
Tap devices:
# iptables -I FORWARD -i tap+ -j ACCEPT
# iptables -I FORWARD -o tap+ -j ACCEPT
# iptables -I INPUT -i tap+ -j ACCEPT
# iptables -t nat -I POSTROUTING -o EXTERNAL_INTERFACE -j MASQUERADE
Please use these firewall rules as a reference only.
Don't forget to replace EXTERNAL_INTERFACE with your WAN interface (eth0, ppp0, etc).
You will need ssh-agent running before you start NetworkManager-ssh.
How do you know if you have ssh-agent running? Simply run:
$ env | grep SSH
SSH_AGENT_PID=16152
SSH_AUTH_SOCK=/tmp/ssh-mGTf3Q1L2oPf/agent.16151
SSH_ASKPASS=/usr/libexec/openssh/gnome-ssh-askpass
You should see something similar to that.
NetworkManager-ssh probes for the ssh-agent that is attached to your session and authenticates with its socket.
If you wish to run that plugin with a non-root user on the other side, but with tunnel support, you can prepare the tunnel device on the other end before hand, and then you can login with a non-root account. Run the following on the remote server:
# ip tuntap add name tun101 mode tun user dan
The command above will allow tun101 to be opened by used dan.
Now, you can configure the plugin to use tun101 and user dan on the remote end. If you still get an error like:
debug1: Remote: Failed to open the tunnel device.
channel 0: open failed: connect failed: open failed
Tunnel forwarding failed
It is likely something is misconfigured, and you'll have to debug further.
Initially, any SSH command flags were allowed to be passed. However, this could cause a privilege escalation issue - so that option was removed (#98). Therefore, as handy as it may be, please do not ask to add that feature again :)
If the destination host is not in your known_hosts file, things will not work. Check your logs to understand if that is the case.
In order to open a tunnel OpenSSH VPN, all that you have to do is run:
#!/bin/bash
# This is the WAN IP/hostname of the remote machine
REMOTE=vpn.nm-ssh.com

# Remote username will usually be root, or any other privileged user
# who can open tun/tap devices on the remote host
REMOTE_USERNAME=root

# Remote IP in the tunnel
REMOTE_IP=172.16.40.1

# Local IP in the tunnel
LOCAL_IP=172.16.40.2

# Netmask to set (on both sides)
NETMASK=255.255.255.252

# SSH port to use
PORT=22

# MTU for tunnel
MTU=1500

# Remote tunnel device (tun100/tap100)
REMOTE_DEV=100
DEV_TYPE=tun

# TUNNEL_TYPE is 'point-to-point' for tun and 'ethernet' for tap
TUNNEL_TYPE=point-to-point

# Local tunnel is calculated depending on what devices are free
# The following loop iterates from 0 to 255 and finds a free
# tun/tap device
for i in `seq 0 255`; do ! /sbin/ip link show $DEV_TYPE$i >& /dev/null && LOCAL_DEV=$i && break; done

# Finally, the command that does it all:
ssh -f  -o PreferredAuthentications=publickey -o NumberOfPasswordPrompts=0 -o ServerAliveInterval=10 -o TCPKeepAlive=yes \
    -o User=$REMOTE_USERNAME -o Port=$PORT -o HostName=$REMOTE -o Tunnel=$TUNNEL_TYPE -o TunnelDevice=$LOCAL_DEV:$REMOTE_DEV \
    $REMOTE "/sbin/ip addr add $REMOTE_IP/$NETMASK peer $LOCAL_IP/$NETMASK dev $DEV_TYPE$REMOTE_DEV; /sbin/ip link set $MTU dev $DEV_TYPE$REMOTE_DEV up" && \
/sbin/ip addr add $LOCAL_IP/$NETMASK peer $REMOTE_IP/$NETMASK dev $DEV_TYPE$LOCAL_DEV; /sbin/ip link set $MTU dev $DEV_TYPE$LOCAL_DEV up
That's actually an edited export file of a working SSH VPN configuration I have from NetworkManager.
This will create a tunnel of 172.16.40.1<->172.16.40.2 on tun100 on both machines. If forwarding is enabled on that SSH server, you'll get pass-through internet easy.
- Thomas Young - First user!
- Whoopie - For nice debian support and testing
- Oren Held - Invaluable feedback and testing
- Lubomir Rintel (@lkundrak)- Keeping this repository up to date with upstream NetworkManager, assisting with Fedora packaging
- Lennart Weller (@lhw) - Debian packaging
- Anyone else who engaged with the project - tested the software & opened tickets, suggested improvements, and/or submitted code
Choosing a connection type:

Main dialog:
Advanced dialog:
