In this article, we will learn how to deploy a Django application with Nginx, Gunicorn, PostgreSQL
- OS - Ubuntu
- WSGI Server - Gunicorn
- Web Server - Nginx
- Database - PostgreSQL
ssh root@IP_Address
sudo apt update
sudo apt upgrade
adduser master
usermod -aG sudo master
We will also add user master to our www-data group(Optional)
usermod -aG www-data master
Now, we can log in as the new user ‘master’
su - master
sudo apt-get install postgresql postgresql-contrib libpq-dev python3-dev
sudo -u postgres psql
CREATE USER database_user WITH ENCRYPTED PASSWORD 'some_password';
CREATE DATABASE database_name OWNER database_user;
ALTER ROLE database_user SET client_encoding TO 'utf8';
ALTER ROLE database_user SET default_transaction_isolation TO 'read committed';
ALTER ROLE database_user SET timezone TO 'UTC';
GRANT ALL PRIVILEGES ON DATABASE database_name TO database_user;
\q
sudo apt install python3-venv
mkdir dir_name

cd dir_name
python3 -m venv venv_name

source venv_name/bin/activate
git clone git_url
pip install gunicorn psycopg2-binary
pip install -r requirements.txt
ALLOWED_HOSTS = ['Ip_Adress', 'domain_name.com', 'www.domain_name.com']
DATABASES = {
    'default': {
        'ENGINE': 'django.db.backends.postgresql_psycopg2',
        'NAME': 'djangodb',
        'USER': 'djangouser',
        'PASSWORD': 'm0d1fyth15',
        'HOST': 'localhost',
        'PORT': '',
    }
}
Luckily Django comes with a utility to run checks for a production-ready application run the following command in your terminal.
python manage.py check --deploy
- You will see an output with no errors but several warnings. This means the check was successful, but you should go through the warnings to see if there is anything more you can do to make your project safe for production.
python manage.py makemigrations

python manage.py migrate
We can test the app by running the local development server but first, we need to create an exception at port 8000.
sudo ufw allow 8000

python manage.py runserver 0.0.0.0:8000
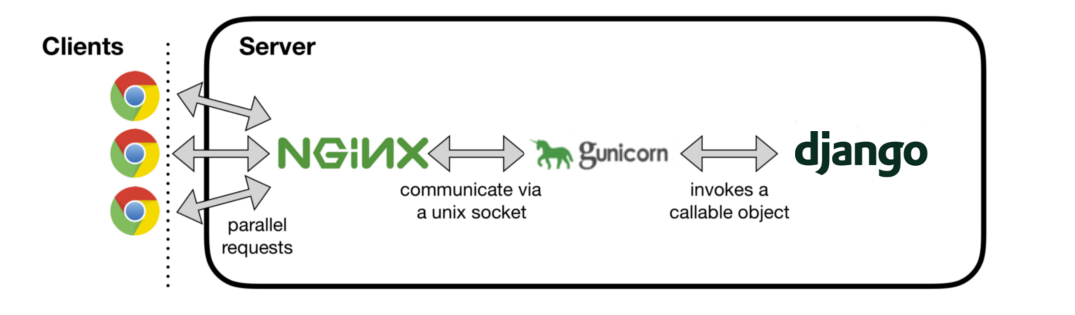
Django's primary deployment platform is WSGI. WSGI stands for Web Server Gateway Interface and it is the standard for serving Python applications on the web.
When you generate a new project using the start project command, Django creates a wsgi.py file inside your project directory. This file contains a WSGI application callable, which is an access point to your application. WSGI is used for both running your project with the Django development server, and deploying your application with the server of your choice in a production environment.
You can test if Gunicorn is able to serve the project as follows.
gunicorn --bind 0.0.0.0:8000 project_name.wsgi
🎉Go back to http://server_domain_or_IP:8000 you should see the application running but without static assets such as CSS and images.
Once you finishing testing the app press ctrl + c to stop the process and deactivate the virtual environment.
deactivate
Gunicorn uses its .sock files to talks to other parts of the process. Sock files are Unix domain sockets that processes use to communicate. I personally prefer keeping the sock file in /var/log/gunicorn so it can be easily accessible by Nginx. Therefore we need to make a directory there. Reminder! continue with the directory that is you are working on(project folder name)
mkdir /var/log/gunicorn
With that now create and open a systemd service file for Gunicorn with sudo privileges and add the below configuration. Reminder! unix_user_name, /path/to/the/project/directory, /path/to/virtual-env/bin/gunicorn, project_name.sock project_name.wsgi:application
- unix_user_name- By default it's root
sudo nano /etc/systemd/system/gunicorn.service
[Unit]
Description=gunicorn daemon
After=network.target

[Service]
User=unix_user_name
Group=www-data
WorkingDirectory=/path/to/the/project/directory
ExecStart=/path/to/virtual-env/bin/gunicorn --access-logfile - --workers 3 --bind unix:/var/log/gunicorn/project_name.sock project_name.wsgi:application

[Install]
WantedBy=multi-user.target
sudo systemctl start gunicorn

sudo systemctl enable gunicorn
sudo systemctl status gunicorn
If the output indicates an error has occurred you must have misconfigured something so check the logs to find it out. To see the Gunicorn logs run the following command.
sudo journalctl -u gunicorn
In case you had to make changes in the service file reload the daemon to reread the new service definition and restart the Gunicorn process by these commands.
sudo systemctl daemon-reload
sudo systemctl restart gunicorn
sudo apt-get install nginx
Since Nginx is going to serve our static assets it's recommended to set the STATIC_ROOT to /var/www/static/ so that it can be easily accessible to Nginx.
So in your project's settings.py modify the STATIC_ROOT as shown below.
  288  source env/bin/activate
  289  cd Django_Hetzner_deployment/
  290  sudo mkdir /var/www/static
  292  sudo chown -R www-data:www-data /var/www/static
  293  python manage.py collectstatic
location /media/ {
    root /var/www;
}
location  /static/ {
    root /var/www;
}
STATIC_URL = 'static/'
STATIC_ROOT = '/var/www/static'

MEDIA_URL = 'media/'
MEDIA_ROOT = '/var/www/media'
--//--
STATIC_ROOT = '/var/www/static'
python manage.py collectstatic
sudo nano /etc/nginx/sites-available/project_name
- server_domain_or_IP -Type domain name or server IP.
- /path/to/staticfiles: If you are following the guide then it should be /var/www
server {
    listen 80;
    server_name server_domain_or_IP;

    location = /favicon.ico { access_log off; log_not_found off; }
    location  /static/ {
        root /path/to/staticfiles;
    }

    location / {
        include proxy_params;
        proxy_pass http://unix:/var/log/gunicorn/project_name.sock;
    }
}
sudo ln -s /etc/nginx/sites-available/project_name /etc/nginx/sites-enabled
sudo nginx -t
👌If the test was was successful go forward and restart the Nginx server so that changes can take place.
sudo systemctl restart nginx
Finally, we need to open up our firewall to normal traffic on port 80. Since we no longer need access to the development server, we can remove the rule to open port 8000 as well.
sudo ufw delete allow 8000
sudo ufw allow 'Nginx Full'
Now in your browser navigate to http://domain_name_or_server_IP the application should be running here.
In case you don't see your application running that means there must be some misconfiguration in the server block so go through the Nginx logs and solve the issue.
Run the following command to access Nginx logs.
sudo tail -F /var/log/nginx/error.log
Let's Encrypt is a free Certificate Authority (CA) that issues SSL certificates. You can use these SSL certificates to secure traffic on your Django application. Lets Encrypt has an automated installer called Certbot with Certbot you can very easily add a certificate to your site in just a couple of minutes
sudo apt-get update
sudo apt-get install python3-certbot-nginx
Certbot can automatically configure SSL for Nginx, but it needs to be able to find the correct server block in your config. It does this by looking for a server_name directive that matches the domain you're requesting a certificate for so make sure you have set the correct domain in the /etc/nginx/sites-available/project_namefile.
. . .
server_name example.com www.example.com;
. . .
In case you made changes to this server block reload Nginx.
sudo systemctl reload nginx
Next, we need to configure ufw firewall to allow HTTPS traffic.So first enable ufw firewall if it's not already.
sudo ufw allow ssh

sudo ufw enable
- Enter y for confirmation next add following rules to the firewall.
sudo ufw allow 'Nginx Full'

sudo ufw delete allow 'Nginx HTTP'
sudo ufw status
Status: active

To                         Action      From
--                         ------      ----
Nginx Full                 ALLOW       Anywhere
22/tcp                     ALLOW       Anywhere
Nginx Full (v6)            ALLOW       Anywhere (v6)
22/tcp (v6)                ALLOW       Anywhere (v6)
sudo certbot --nginx -d example.com -d www.example.com
But, "Certbot not found":
sudo apt update

sudo apt install snapd
sudo snap install core
sudo snap install --classic certbot

sudo ln -s /snap/bin/certbot /usr/bin/certbot
Now, try again sudo certbot --nginx -d example.com -d www.example.com
You will be asked a series of questions for the setup:
ANSWER Y,Y,Y....for YES,YES,YES
sudo certbot renew --dry-run
- If you see no errors, you’re all set. When necessary, Certbot will renew your certificates and reload Nginx to pick up the changes.